by Sherri Sylvester | May 16, 2013
Hi folks, we’re finally into Day 3 here at Thread Riding Hood Spring Shorts Week.
If you have been wondering where I was today, you need the Thread Riding Hood Facebook page! A photo of today’s shorts and a status update were posted last night. Like us and access “new post” updates, links to sewing related giveaways, a chance to hear from and comment with other sewing fans and important answers to questions like “Where is the third installment of Spring Shorts Week? I can’t wait to see what it is!” (PS. You also get sneak peeks of sewing projects before they are posted here! Shhh… don’t tell!)
Alright, enough of that! Here’s today’s tutorial:
Simple Knit Shorts with Oval Knee Pads and Easy Hem

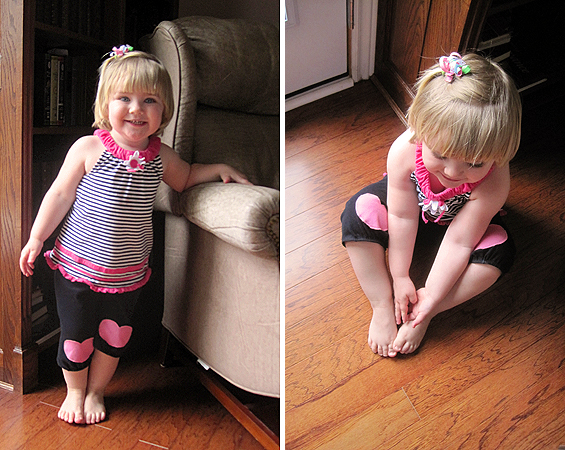
It is possible that these are the easiest of this week’s shorts – though I am not sure, seeing as how tomorrow’s shorts use a lot less fabric (for girls) and don’t need a “proper” hem because they are lined. This pair of shorts does not have a “proper” hem either, instead it is replaced with a cuff that matches the oval knee pads. The really great thing about these shorts is that they are a bit more unisex than the others this week. I think these shorts would look perfectly comfy and cute on a boy – you’d just need to tie the twill into a knot instead of a bow.
You will need:
- knit material – yardage depends on the size of your pattern piece (read through the tutorial to make sure you have enough material for the pattern piece and the casing)
- contrasting knit for the oval knee pads, cuffs and casing
- regular sewing machine (you do not need a serger to sew knits!)
- 3/4″ or 1″ non-roll elastic
- 8″ twill tape (ribbon) to match/contrast the shorts
- old pair of pants with worn knees (to check where the knee pads should go)
- tissue paper, paper, or tear-away stabilizer
- ballpoint sewing machine needle (for sewing knits)
- pins/glue stick/scissors/matching thread/water soluble marking pen/other sewing gear
- Shorts Pattern Piece – Make your own in any size: {How To} Make a Kid’s Simple Knit Shorts Pattern OR click on the following link to download the 5 page Size 3 printable pdf
- Oval Knee Pad Pattern Piece – click HERE to download the printable pdf (in 3 different sizes)
Before you begin (if you are using the printable Size 3 pattern piece):
- Print out all 5 pages of the pattern piece pdf on letter size (8.5″ x 11″) or A4 paper. Important: Do not select “fit to page” when printing, make sure you print at the original size. Once you have printed the pages, measure the 1″ test square to ensure the pattern is the correct size.
- Cut or fold the pages on the outer gray lines and tape/glue the pages together, matching the letters in the gray half-circles.
Tips on Sewing Simple Knit Shorts for Boys:
- tie the twill tape in a knot instead of a bow
- paint on a freezer paper “sport” number like these
- top-stitch on a fake fly like these
Here we got
Again, this tutorial is based on the Simple Knit Shorts tutorial from earlier this week. It might be handy to have it available in an extra browser tab or printout.
Step 1: Follow Steps 1 and 2 on the Simple Knit Shorts tutorial to cut out your fabric and casing. Cut the casing from contrasting fabric that will match your knee pads and cuffs.
Step 2: Cut out your knee pads following the printable pattern piece. Choose an oval size from the printable pdf that best fits the scale of the shorts you are making. I have labeled the size I used as Size 3 – for those using the printable Simple Knit Shorts pattern piece. Give them a press if needed. (If you are wondering why there is a seam at the edge of my fabric, I was able to use an old t-shirt for the contrasting knit in these shorts.)
Step 3: Now we measure and cut the bands for the hem cuffs. (1) Cut a 2 1/2″ high piece of contrasting knit that is the width of your pant leg. (2) Stretch your newly cut band as far as it will stretch and cut off any fabric that stretches past the width of your pant leg. (The cut cuff band on the shorts fabric in the photo is the same length as the one I am stretching.)
Step 4: This one is easy! Tie your short piece of twill tape in a bow (you can use a lighter to – CAREFULLY! – melt the ends of the tape so it will not fray) and check to make sure you have the things in the following picture. (Oops – missed the bow.)
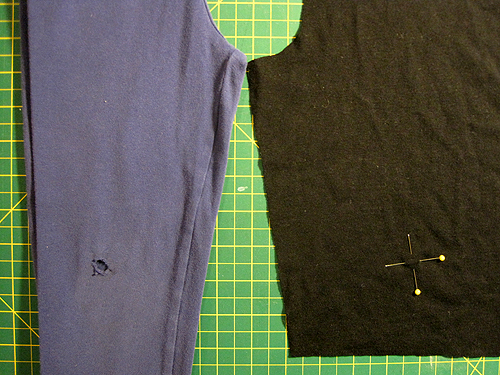
Step 5: Follow Steps 5 and 6 from the Simple Knit Shorts tutorial to find your knee pad placement.
Step 6: Grab your glue stick (wouldn’t be a Thread Riding Hood tutorial without one!) and apply glue to the oval shape. Stick it to your shorts fabric, use the mark you just made to centre it. (Make sure you have at least 1″ between the hem line and the cuff. You will need this space later to add the cuff.)
Step 7: (1) Use a water soluble pen to mark “quilting” lines on your knee pad. I used unevenly spaced straight lines in the opposite direction of my stripes. (2) Stitch (using a ballpoint needle) across your knee pad quilting lines, I used a thin zig-zag to make things more interesting – be creative! (3) Stitch close to the edge of your knee pads with a straight stitch. (4) Use water to remove your water soluble pen markings. Your knee pads are done! (Note: If you have very stretchy or thin knit you might want to place some tissue/paper or tear away stabilizer behind the knee pad while you sew it on – so stop it from stretching.)
Step 8: Follow Steps 12 through 21 from the Simple Knit Shorts tutorial to stitch the shorts together (and then come back!). You can skip Steps 13 (3) and 13 (4), we will be adding a cuff here instead.
Step 9: (1) Iron your cuff bands lengthwise, right sides out. (2) Unfold the bands, fold them the other way and pin them into loops. (3) Stitch them across the short ends with a 1/4″ seam allowance.
Step 10: (1) Re-fold the cuff band lengthwise where you ironed it. (2) Mark the pant hem and the cuff band evenly in 4 places. (3) Match up the seam in the cuff band and the inseam of the shorts. Match up the raw edges of the cuff band and the shorts hemline, pin the cuff band to the right side of the shorts. Match up your other 3 marks on the shorts and band, use them to pin the cuff band around the shorts hemline.
Step 11: (1) Stitch the band to the shorts with an aprox. 3/8″ seam allowance. Stretch the cuff band to the width of the shorts hemline between your pins as you sew. (2) You will end up with a wonky looking hem line! (3) Turn out your cuff – amazing! It looks so cute!
Hooray! You are finished!
And… another one tomorrow – Simple Knit Sport Shorts with a Lining! (or today, as I am about 15 minutes into Thursday right now!)
by Sherri Sylvester | May 14, 2013
Day 2 of Spring Shorts Week coming right up!
Simple Knit Shorts with Side Pockets
Today’s tutorial is largely based on yesterday’s shorts’ construction, you will be omitting the knee pads and sewing on side pockets instead. Use THIS tutorial for the bulk of the construction, so it might be nice to have it available for easy reference – but don’t worry, I will walk you through it!
These came out super cute, I’m really happy with them! I had an old t-shirt that worked perfectly for the pockets and I used some brown double-knit that was hanging around from another project.
You will need:
- knit material – yardage depends on the size of your pattern piece (read through the tutorial to make sure you have enough material for the pattern piece and the casing)
- contrasting knit for the pockets
- regular sewing machine (you do not need a serger to sew knits!)
- 3/4″ or 1″ non-roll elastic
- 1/4″ braided or knit elastic
- 8″ twill tape (ribbon) to match/contrast the shorts
- tissue paper, paper, or tear-away stabilizer
- ballpoint sewing machine needle (for sewing knits)
- pins/scissors/matching thread/other sewing gear
- Shorts Pattern Piece – Make your own in any size: {How To} Make a Kid’s Simple Knit Shorts Pattern OR click on the following link to download the 5 page Size 3 printable pdf
- Pocket Pattern Piece – click HERE to download the printable pdf
Before you begin:
- Print out all 5 pages of the pattern piece pdf on letter size (8.5″ x 11″) or A4 paper. Important: Do not select “fit to page” when printing, make sure you print at the original size. Once you have printed the pages, measure the 1″ test square to ensure the pattern is the correct size.
- Cut or fold the pages on the outer gray lines and tape/glue the pages together, matching the letters in the gray half-circles.
Tips on Sewing Simple Knit Shorts with Side Pockets for Boys:
- tie the twill tape in a knot instead of a bow
- Use tall rectangular pockets instead of pleated ones
- don’t use elastic on the leg hem, use a straight hem all the way around
- paint on a freezer paper “sport” number like these
- top-stitch on a fake fly like these
Step 1: Follow Steps 1 and 2 on the Simple Knit Shorts tutorial to cut out your fabric and casing.
Step 2: Cut out your pockets using the printable pattern piece. Also cut 2 Pocket bands that are 2″ tall by your pocket width (these will be cut shorter later, so if you are short on fabric read on and cut them when you do your “stretch test”).
Step 3: This one is easy! Tie your short piece of twill tape in a bow (you can use a lighter to – CAREFULLY! – melt the ends of the tape so it will not fray) and check to make sure you have the things in the following picture.
Step 4: Locate the front on each of your main shorts pattern pieces and lay them out. If your knit does not have an obvious “right side” make sure you mark the outside of your material so you have two opposite pieces (see photo).
Step 5: (1) Mark the pleats on your pockets with pins. (2) Fold the pocket in half right-sides together and mark where the 2 pleat pins line up. Also make a mark 1″ down from the top near the fold. (3) Stitch 1″ down the pockets at the pleat marking, stop when you reach your 1″ marking and back-stitch to hold it in place.
Step 6: (1) Fold the pleat open evenly on both sides of the stitching and pin it open on the wrong side of both pockets. (2) Fold your Pocket bands in half lengthwise wrong sides together and give them a quick iron to hold it in place. (3) Stretch the pocket band as much as it will stretch and cut the “fully stretched” length to match your newly pleated pocket width. (See the photo – the band I am stretching is the same length as the band above it when it is not being stretched.)
Step 7: (1) Stretch and pin the folded band evenly to the right side of the pocket. (2) Stretch and stitch the band to the top of the pocket with a 1/4″ seam allowance. Use a ballpoint needle and a thin long zig-zag stitch. (3) Open up the band and press the seam allowances down to the pocket side.
Step 8: Place the pocket on your shorts. If you are using the printable size 3 pattern, use the placement lines on the pattern piece. If you made your own pattern, centre the pocket on the centre of each shorts leg piece. (Again, make sure you have 2 opposite leg pieces!) The pocket is 2-3 inches above the hem-line.
Step 9: Stitch around your pocket, leaving the top “cuff” open. I used a double needle and stitched about 1/8″ away from the edge. These pockets have raw edges and won’t fray because they are knit. Back-stitch a little extra at the beginning and ending of your stitching so the pockets don’t tear out when they are used. Place tissue/paper/tear away stabilizer behind the pocket so your stitching does not stretch the fabric and cause a wavy seam line.
Step 10: Follow Steps 9 through 21 of the Simple Knit Shorts tutorial to finish these shorts.
Hooray you are done!
And… There’s more to come tomorrow – Simple Knit Shorts with Oval Knee Pads and Easy Hem!
Oh… and before I forget – don’t you forget to enter the giveaway from Fabric Spot. It’s over on Friday and you’ll miss out on that Tsuru! Go and get it!
by Sherri Sylvester | May 13, 2013
Welcome to Day 1 of Spring Shorts Week! Ready to go? Today is the full tutorial on how to make a complete pair of shorts. The rest of the week we will cover off different variations based on this tutorial. You can do this – and then you can make 4 more pairs based on the same pattern! They get faster the more you make, hooray for easy!
Simple Knit Shorts with Heart Knee Pads
You will need:
- knit material – yardage depends on the size of your pattern piece (read through the tutorial to make sure you have enough material for the pattern piece and the casing)
- contrasting knit scrap for the heart knee pads
- regular sewing machine (you do not need a serger to sew knits!)
- 3/4″ or 1″ non-roll elastic
- 1/4″ braided or knit elastic
- 8″ twill tape (ribbon) to match/contrast the shorts
- old pair of pants with worn knees (to check where the knee pads should go)
- tissue paper, paper, or tear-away stabilizer
- ballpoint sewing machine needle (for sewing knits)
- pins/glue stick/scissors/matching thread/other sewing gear
- Shorts Pattern Piece – Make your own in any size: {How To} Make a Kid’s Simple Knit Shorts Pattern OR click on the following link to download the 5 page Size 3 printable pdf
- Heart Knee Pad Pattern Piece – click HERE to download the printable pdf (in 3 different sizes)
Before you begin (if you are using the printable Size 3 pattern piece):
- Print out all 5 pages of the pattern piece pdf on letter size (8.5″ x 11″) or A4 paper. Important: Do not select “fit to page” when printing, make sure you print at the original size. Once you have printed the pages, measure the 1″ test square to ensure the pattern is the correct size.
- Cut or fold the pages on the outer gray lines and tape/glue the pages together, matching the letters in the gray half-circles.
Tips on Sewing Simple Knit Shorts for Boys:
- tie the twill tape in a knot instead of a bow
- switch the knee pads for ovals (coming on Wednesday!), or don’t put them on at all
- don’t use elastic on the leg hem, use a straight hem all the way around
- paint on a freezer paper “sport” number like these
- top-stitch on a fake fly like these
Here we go!
Step 1: Fold your fabric in half, make sure the full width of the pattern piece fits on the fabric! Important: Check the direction of the knit that stretches the most. This direction should be parallel to the top/casing and hem of the pattern – otherwise these won’t stretch the correct direction to fit your child. Cut out your fabric. If you have made your own pattern piece make sure you remembered to add a seam allowance before cutting!
(Lucky you, you can see my fancy pattern weights – empty kids paint containers filled with beans!)
Step 2: Now you need to figure out the size of your casing, follow the steps below and then cut 2 pieces that are “A” wide and “B” high. “A” should be along the stretchiest direction of your knit.
- Grab the fabric shorts piece you just cut and stretch the top as far as it will go, note the measurement – this is “A”. (photo 1) – My double-interlock knit stretched to 21″, but all knits are different
- Measure your elastic width and note it – this is “B”. (photo 2)
- Casing Length is: “A” + 1/2″ for seam allowances
- Casing Height is: “B” x 2 + 1″ for seam allowances
Step 3: Cut out your knee pads following the printable pattern piece. Choose the heart size from the printable pdf that best fits the scale of the shorts you are making. I have labeled the size I used as Size 3 – for those using the printable Simple Knit Shorts pattern piece.
Step 4: This one is easy! Tie your short piece of twill tape in a bow (you can use a lighter to – CAREFULLY! – melt the ends of the tape so it will not fray) and check to make sure you have the things in the following picture (PLUS the 1/4″ braided or knit elastic that I forgot to photograph!)
Step 5: Locate the front on each of your main shorts pattern pieces and lay them out. If your knit does not have an obvious “right side” make sure you mark the outside of your material so you have two opposite pieces (see photo).
Step 6: Lay your old pants next to the new pants to see where to place your knee pads. This is a great idea from
Made By Rae (her step 3). I use two pins crossed at the centre of where I want the kneepads to go. (
If you printed the size 3 pattern, use the marking on the pattern piece.)
Step 7: Grab your glue stick (wouldn’t be a Thread Riding Hood tutorial without one!) and apply glue to the heart shape. Stick it to your shorts fabric using the mark you just made.
Step 8: Grab some matching thread and use a ballpoint needle to top-stitch close (1/8″) to the edge of your knee pad. Put a piece of tissue paper/regular paper (I used IKEA paper)/tear-away stabilizer behind the knee pad so it doesn’t stretch while you are sewing. Remove your paper/stabilizer and take a look at your cute kneepad!
Step 9: (1) Fold each pant leg fabric piece in half and mark the side with a pin. (2) Measure the width across the front pant leg. (3) Cut a piece for each pant leg that is a bit longer than half your “front leg” measurement. Make sure the elastic will stretch across the entire front leg. Example: The measurement across a size 3 front leg is 7″. I cut each piece of braided elastic to 4″.
Step 10: (1) Stretch and pin your elastic across the bottom of the front of the pant leg on each of your fabric pieces. (2) Thread some matching thread through your machine and sew across the elastic that is pinned to your front pant leg with a wide zig-zag. Stretch the elastic as you go so it reaches across the entire front pant leg. Repeat on the other leg. (3) The bottom of your front pant legs should each look like the third photo below.
Step 11: Now we finish hemming the shorts. (1) Turn up 1/4″ (or the width of your elastic) on the back pant leg and pin across until you reach the elastic. It is hard to pin this portion of the pant leg, so I don’t usually worry about it, but if it will help you to keep everything in place pin this up as well. (2) Stitch across the bottom front pant leg with a wide zig-zag stitch. Make sure to stretch the elastic to the width of the front pant leg as you stitch over it. (3) When you get to the non-elasticized part of the hem, switch your machine to a long straight stitch. Also, be sure to place a piece of tissue paper/tear away stabilizer under your fabric when you stitch over the back pant hem to keep it from stretching too much.
Step 12: Now we can stitch the pants together! (1) Choose a stretch stitch if your machine has one (1st photo), or use a thin, long zig-zag stitch. (2) Place your two fabric pieces over each other right sides together, matching up the front and back centre seams, pin. (3) Stitch the front and back centre (crotch) seams with an aprox. seam allowance of 3/8″.
Step 13: (1) Fold your pants so the inner leg seam is right sides together. Pin. (2) Stitch from one side of the inner leg seam to the other. When you come to the seam allowances for the centre seams fold one toward your presser foot and one away – to reduce the bulk where the 4 seams meet. (3) Fold the seam allowance at the bottom hem of each pant leg to the back and pin. (4) Stitch down the seam allowance about 1″ to keep it in place and neatly finish the bottom hem.
Look, You’ve made it so far – they actually look like pants now! We’ve just got the casing, elastic and bow left… you can do it! (Here’s a cute photo to keep you going!)
Step 14: Pin the top of your shorts to mark 8 even sections. (1) Place a pin on the front and back centre seams at the seam. Fold your pants so the front/back centre seams are together and place a pin at each of the side seam creases. (2) See the second photo – Match up the pins that are side-by-side (yellow pins) and place a pin in the crease that marks the half-way point between each set of pins (pink pin). (3) Your pins should look like the third photo.
Step 15: Take your casing pieces and stitch them right sides together into a large tube with a 1/4″ seam allowance. Fold the casing in half lengthwise and pin it together evenly at 8 points. Do this by following the folding technique that you used to mark the top of the pants in Step 14.
Step 16: (1) Pin the casing to the top RIGHT SIDE of your shorts matching your pin markings. Match up the seams in your casing to the side “seam” pin markers. (2) Mark a small 1.5″ section with different coloured pins to indicate where to leave an opening.
Step 17: Stitch around the edge you just pinned with an aprox. 3/8″ seam. Stretch the pant top fabric to match the casing length while you sew. Start and finish with a back-stitch, leaving the small space you marked open.
Step 18: (1) Thread your elastic through the casing, keeping it straight. When you have finished threading it through, pin the ends of the elastic together and check to make sure the elastic has not rolled while you were threading it through. Ensure the pants fit your child by trying them on and adjusting the elastic length. If you don’t have your child near (or they are sleeping!), compare the size of the waist to the pants you used to find the knee pad placement and make sure it is similar. (2) Stitch your elastic and cut off the excess.
Step 19: Pin up your opening and stitch it closed.
Step 20: (1) Mark your side seams with a pin. (2) Stitch over the elastic to further ensure it does not roll. Stitch from the top to the bottom of the elastic, only at the side seams.
Step 21: (LAST STEP!!) Stitch the bow onto the front centre of your shorts with a wide zig-zag (bar tack) over the “knot” in the bow.
Hooray – you are all done! Try those shorts on a small, cute someone… (If they are sleeping, try to wait until morning… I know… it’s hard!)
And… come back for tomorrow’s tutorial: Kid’s Simple Knit Shorts with Side Pockets!
by Sherri Sylvester | May 12, 2013
Happy Mother’s Day!
…to all the moms (especially my Mom and Mother-in-law!)
I am thankful for the beautiful girls that made me a mama. They gave me flowers I can plant this year – so they won’t die in a week. I am thankful that I am able to take care of these two and “grow them up” as best I know how. And thanks to my wonderful husband for helping me out!
by Sherri Sylvester | May 10, 2013
Here to announce… (drumroll please!) Next week is “Spring Shorts Week” on Thread Riding Hood! (But you already know that if you snuck a peek on Facebook!)
The plan is (if all goes as planned… !) to post a tutorial for 5 different versions of Kid’s Simple Knit Shorts – one on each week day – starting on Monday. I’ve got two of them sewn already – based on these ones I made for my daughter last week. The others are all planned and the fabric is waiting!
If you are going to sew along, you will need a pattern and that is what we are going to cover today. I know there are versions of “how to make a pants pattern” all over the internet, but maybe you will like mine the best?! This pattern has a separate casing that we will stitch on later, so that is not included in this drafting “how to”.
If you don’t want to draft this and your child fits in a size 3 you are in luck! I am going to post the pattern piece for a size 3 on Monday along with the first tutorial.
All the shorts will use the same basic pattern piece (that you can draft by following this post) and I will provide downloads for any additional pieces that are needed for each tutorial as we go.
Here’s how the week should shape up (I will update this list with links as we go):
You will need:
- large paper – freezer paper/tracing paper/newspaper (I use the large rolls of kids’ paper from IKEA)
- pencil(s)
- 1 pair of pants/shorts in the size you want to copy (more on this below)
- a pair of shorts or a measurement from the bottom of the casing on your kids pants to just under their knee
- long ruler
- scissors
Here we go:
Step 1: Fold your large paper in half, unfold and draw a line down the fold. Make sure the paper is large enough to draw each leg of the shorts when folded in half, remember they won’t be as long (see the photo). Mark the length of the shorts on your sample pants. The longest length needed for the tutorials coming up next week is just under the knee. Add 1″ for hem and casing allowances and you will be fine.
Step 2: Choose the pants/shorts you will use to make your pattern. Here are a few important things to keep in mind.
- I made a pair of these shorts last week that did not fit because the knit material in the pants I copied was stretchier than the knit I used to make the pants. Check the stretch on each (The direction that stretches the most will be going around your child) and make sure the stretch in the knit you will be using is the same or more than the pants you are copying.
- The shorts I am making the tutorials for are not meant to be tight fitting. I used a pair of woven pajama pants to make the pattern.
- If you need some information on knit materials go here. (There is a great description of the difference between woven and knit material in the 4th paragrah.)
- Oh, and make sure they fit your kid – I guess that goes without saying!
Step 3: Fold the pants (FRONT side out) in half along the seam lines. Make sure they look like the photo below. Line up the pant leg and the centre front “crotch” seam so they are roughly parallel to the line you drew in step 1. Line up the length measurement you found in Step 1 with the bottom of your paper. Trace along the inner pant seam and crotch seam up to the casing.
Step 4: Mark the bottom of the casing on the long straight line and on the line you just drew at the centre-front.
Step 5: (1) Use a ruler (ideally a quilting ruler to line everything up) to draw a line across your paper. Have the line cross through the corner made by the bottom of the crotch curve and the start of the inner leg seam. (2) The line should be at right angles with the long line you drew in Step 1.
Step 6: Label this half of the pattern “FRONT” and include the size and date and child it is for. It is good not to forget these things when you need it later!
Step 7: Fold the pants (BACK side out) in half along the seam lines. Make sure they look like the photo. Line up the pant leg and the centre back crotch seam along the other half of your paper so they are roughly parallel to the line you drew in step 1. The corner made by the back crotch curve and the start of the inner leg seam should line up with the line you drew in Step 5.
Step 8: Trace along the inner pant seam and crotch seam up to the casing. Make the centre back line parallel to the line you drew in Step 1 if you need to (see photo). Mark the top of the casing.
Step 9: Match up the casing lines with your ruler and draw a line across the top of the pants pattern.
Step 10: Add your seam allowances – I used 3/8″. There are two ways to do this. (1) Use a sewing guage or regular ruler to mark a seam allowance on all sides of your pattern except the hem. Now draw on your seam allowance using those markings. (2) Use this fancy trick from Pinterest by taping two pencils together. (BTW – this is found on my Pinterest board: Sewing Tips and Tricks, if you want to follow!)
Step 11: Mark the BACK on the back side of the pattern piece and cut it out all around the seam allowance you just drew.
Step 12: (1) Fold your pattern in half along the centre line. (2) Mark a straight line along the bottom hem edge at right angles from the centre line. (3) Cut the pattern on this line to even up the hem-line.
Hooray you are done! I can’t wait to share the tutorials next week, these shorts are really cute and easy to sew! I’m going to be making them for a girl, but providing tips so you can make them more boy-friendly, except for the skirt of course! As usual – let me know if you have any questions. Leave them in the comments or email me: sherri (at) threadridinghood (dot) com
AND! Not to ignore Mother’s Day – which is VERY important! (If I do say so myself!) If you want to check out my super-duper new and fancy re-styled Tutorials page – you just might find something your Mom would love! And might I suggest:
Hope you have a wonderful weekend! Happy Mother’s Day to all of you that are or are soon-to-be moms! I know my family’s got something planned – my youngest spilled the beans after I had been out at work – “Mommy… I can’t find your cards…?” Umm… “Someone must have hidden them, honey.” Secrets don’t work out so well when you are tiny!