by Sherri Sylvester | Jul 31, 2014
I am hoping you all won’t mind helping me out with a decision I’m trying to make… and I’ve included some of our Quebec vacation photos along the way.

My husband surprised me in Quebec with this #isew bracelet, it even has Thread Riding Hood written on the inside. Yay! But, on top of that he gave me an amazing birthday gift, the opportunity to buy a new sewing machine! And I am so grateful and surprised, because I was not expecting it. (He’s amazing too!) Here’s where you come in… I’m not sure if I should take him up on it… Wait… I know, I’m not crazy – there’s more…
Here’s my reasoning… I love my machine – it’s a Janome SUV1122. Not fancy in any way, but it has served me well for quite a few years and I know my way around it. I know what it likes and dislikes. I’ve sorted out zippers, button holes, simple quilting, elastic thread, sewing knits and even a rolled hem or two. When I bought this machine it came with about 10 different feet that I have found invaluable as I’ve learned how to use them. It even arrived with a walking foot – which alone costs a third as much as my machine did when I bought it! I’m not sure the feet would fit on a new machine – and buying the same feet would be a big investment.
But… I also love the idea of a new machine, of course! More throat space, a larger area for quilting, a thread cutter, needle up/down control… speed control… maybe even a few embroidered patterns, letters and numbers built in. I could also use my current machine as a backup and for my girls to learn on. My husband asked about one at our local Janome/Bernina shop a few months ago. But in the end, he decided it was best if I chose it myself, so I could get one that has everything I need.
And… as a third option… I’m wondering if I should buy a serger instead? I don’t have one, but of course they are invaluable for finishing seams and sewing knits. I’ve only sewn with one once in high school home ec class and I don’t remember if I liked it or not… but everyone seems to use them. Or maybe I should get a Juki… but I think that’s mostly used for machine quilting?
I’d so appreciate your help to decide what to do. What is your experience… and what do you think I should do? What machines do you like? Do you have a serger and do you use it often?
Thanks so much! I’ll be back again mid-next week or so… we’re off to an electronic-free long weekend, but if I find some wifi you might catch some glimpses of what we are up to on Facebook, Twitter or Instagram. See you soon!
by Sherri Sylvester | Jul 29, 2014
I’ve been wanting to make something else with the Flutter Sleeve Nightgown tutorial I posted earlier this year. Mostly, something that wasn’t a nightgown! I managed to whip up a tunic the week before we headed off to Quebec city on vacation, so I could hopefully try a photo shoot in the old part of the city.
Thankfully my daughter decided to be spontaneous, so we got some fun twirls and cartwheels in front of the Chateau Frontenac. You can’t see much of it here, but it’s huge and beautiful – apparently one of the most photographed hotels in North America. These photos are taken on the boardwalk that runs along the outside, and parallel to the Saint Lawrence River. This day there were lots of tourists and we attracted more than a few glances from curious onlookers. I’m sure they were thinking we were either crazy or amazing and fun for photographing cartwheels in the busy area next to the hotel. (I’m hoping for the latter!)
The fabric I used for the main body of the tunic was a 1/2 metre I picked up from Country Clothesline at the spring Creativ Festival this year. It’s a beautiful print from Martha Negley called Dahlia. (I can’t find it on their site anymore, but this is similar and here is the same thing in lime. PS. This post is not sponsored by them, but I love their fabric selection!) When I brought it home my oldest was so pleased it was for her and I am glad she likes what I made from it as well. The contrasting pink sleeves and hem were a necessity due to my daughter wanting everything “as long as possible, Mom”. I’ve really got to stitch up a maxi dress for her!
The tunic is simple to make, I used the Flutter Sleeve Nightgown pattern piece I drafted for the set of nightgowns I made previously and changed the length of the nightgown main body pattern piece to fit into exactly the length of my 1/2 metre of fabric. It’s always amusing when I have to go back and print out my own tutorial so I can remember how I made the everything the first go around! Thankfully the length turned out just long enough to wear with a pair of shorts. And it’s a good, casual, “to the park” shirt she can happily twirl in it pretty much anywhere!
I’ve got one more post this week and then we are off to our annual cottage weekend with only a small amount of solar energy to keep our lamps working at night. It’s a nice break from the electronic noise we’re used to all the time! And, if you are looking for news on the Quiet Book Sew Along, it will be back soon. We are still on track to finish by the end of November, I’ve just needed quite a few more weeks off than I was expecting. Happy Tuesday to you!
by Sherri Sylvester | Jul 26, 2014
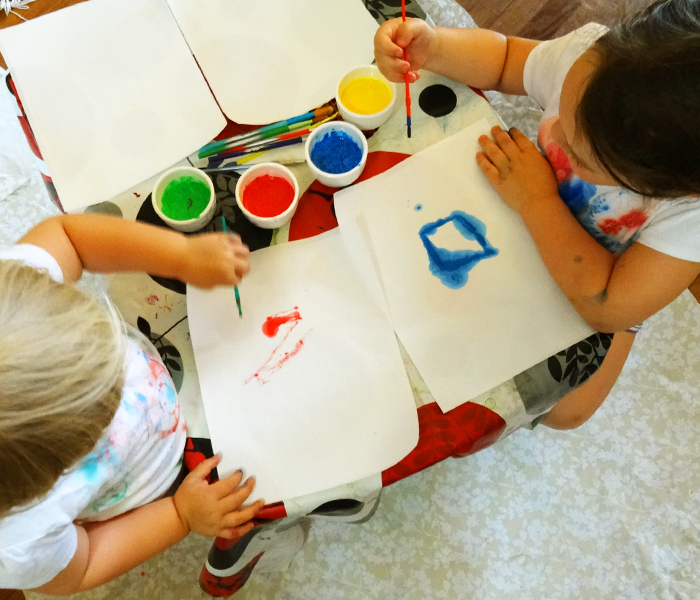
A weekend nod to Kid’s Clothing Week’s end today! This fabric painting idea is a fun summer project to do with your kids. Especially if you plan to do some simple sewing with it. (That they would love to be included in!)
Fabric painting with “puffy paint” is something I immediately associate with the eighties and early nineties. In grade six I made a pair of cut off shorts (right above the knees to be modest of course!) with painted bows all over them in different colours. Very puffy, neon and verrrrry coool. If I remember it right they were the most amazing shorts ever… I wonder what happened to them! (Mom?) Anyhow – it is these memories that make me hesitate when I dig out my old-school fabric paints. The horror of the item I’m painting actually turning out puff-painted is enough to make me run in the opposite direction. Until I found this post by the girl creative.
Though I am blogging this a year later, these photos are from the second time we painted fabric. I thought it would be fun for the girls to use paintbrushes and see if their watercolour paintings could be a bit more intentional than the splatter-type art we created the first time. I love seeing just how much the girls have changed and grown up over the last year! They look so much more grown up now, time goes by so fast. My youngest had just turned 3 at this point, it’s such a great way to preserve their art in something they can touch.
To make these, you can refer to the girl creative’s post. My paintings look a lot different than the watercolour look she got on her fabric – you’ve got to check it out!
The painting is really simple and easier outside because it’s simpler to clean up, but if your kids will sit still it works indoors too. Just make sure you cover everything first because the paints do not wash out. To make each square of fabric easier for the girls to paint on I backed them with freezer paper. Just iron the shiny side onto the back of your fabric and it stays in place. (This works when using fabric pens as well!)
As a confession… I’ve still got the squares the girls painted on my to-do list. (Yikes!) Maybe another summer project I could work on with them?
by Sherri Sylvester | Jul 24, 2014
Thanks so much to everyone for entering the giveaways last week! I am so excited to mail out these prizes. As usual the Rafflecopter widget I use randomizes everything and chooses the winners for me.
Day 1 – Pretty Potent Bundle + Vintage Bias Tape & Rick-Rack ~ WINNER: #1396 – Robin S. who won just by clicking to enter the giveaway.
Day 2 – Handmade Fabric Tray ~ WINNER: #526 – Margo who left a comment to win. She said “Oh that tray looks just adorable! I found another pattern…but I love this one! Pick me! Pick me!”. Looks like it worked out well for her!
Day 3 – Fiskars Scissors and Clover Seam Ripper ~ WINNER: #335 – Laura E. who won by clicking to enter as well!
Day 4 – Two “I can see Clearly Now” Mini Pouches ~ WINNER: #716 – Lori M. who left a comment saying… “We have Jo-Ann’s close by…no real Quit Shops close…an hour drive or longer. So I love to buy from Bear Creek Quilting& Southern Fabrics online stores… also Fabric.com. Am a very Happy customer of them.”
Day 5 – Gold & Crabapple Bundle + Buttons ~ WINNER: #405 – Jacklynn G. who also won by clicking to enter!
I have everything ready to go and will get them in the mail by Saturday for sure. Save Laura, who happens to be a friend in-real-life. I got to drop hers off today! So exciting! I’ve been waiting through two years of giveaways for the randomizer to pick someone I sew with on a regular basis and it finally happened.
If you haven’t won yet don’t despair. There will be more fun happening around here soon! And, I haven’t forgotten that it is Kid’s Clothes Week this week. I’m not sewing along, since I was lucky enough to have contracted strep throat last weekend so I’ve been trying to sleep it off (along with taking some dreaded antibiotics) this week. Just goes to show you should never vacation, whenever you relax your body goes into shock and gets sick! Bad, I know – but true!
Anyhow, in a small nod to the Kid’s Clothes Week theme of “kid art”, I have a photo-shoot from last August (yes, I am that behind in blogging it!) with a fabric painting idea that my kids love, and I should probably do more often. I think I will be able to share it on the weekend. Until then, I am off to get some rest!
by Sherri Sylvester | Jul 22, 2014
And now… back to our regular programming folks! Last week’s giveaways were so much fun and I will be sending out emails to all of the winners today. Thanks again for your comments, I felt so fortunate to be able to find out more about all of you! And especially thanks for the amazing birthday wishes. I had a great day and was spoiled rotten by my husband and kids. I hope you all had as much fun as I did last week!
A while ago I mentioned that I wanted to make the Staple Dress, and what happens? Daryl from Fabric Spark has given me the opportunity to make one! I have had this pattern on my list for over a year, and I LOVE the results. I made a wearable muslin with the regular hem, so I thought that I would change it up and include a tutorial for a drop shirt-tail hem in this pattern review. What is a shirt-tail hem? After some searching I found out it is curved on both sides, like a dress-shirt. And a drop shirt-tail hem is just a bit longer on the back. I really like how it gives the pattern more shape at the hemline.
And, can I say that this is the most comfortable dress I have worn in a long time. It’s perfect for hanging out with the kids – or walking around Quebec city. We did quite a few photo shoots along the way on our vacation last week and it is so nice to have something old and historic in my photo backgrounds! You’ll be seeing more of the city in the next month or so.
I had a lot of fun choosing my fabric from Fabric Spark’s shop. She has so many great fabrics that work really well for sewing apparel. In the end, I decided to chose one of her Art Gallery fabrics, since this dress looks best in a fabric with a great drape. As usual with Art Gallery I was not disappointed! The selvage says “Feel the Difference” and it does not lie. These fabrics are so smooth and the drape is perfect for clothing. I picked African Palm Indigo from the Safari Moon collection by Frances Newcombe. The colour is so amazing in person. It is a soft blue and totally wearable – and almost the same colour as my eyes… which is a fun bonus! I love the art deco palm trees, and the scale is perfect for a dress.
I got the pattern in my Perfect Pattern Parcel #3 purchase (not available anymore). But lucky for you, Daryl has the Staple Dress pattern available on her site. And, it’s the real deal paper version, so you won’t have to print and assemble the pdf pattern to make it! Now when you are choosing your fabric, you can get the pattern too – hint, hint! The pattern is well written, with lots of tips and hints on how to use elastic thread to shirr the waist, and on lengthening and shortening your dress. You can even move the shirring up or down to suit your natural waistline. And… it has pockets! I was so disappointed when I realized I didn’t take any photos of them. But, they are there and I used them a lot. Don’t you just love a good set of pockets?!
On with the tutorial then… Here is how to alter your pattern pieces and hem the new shaped hemline into a drop shirt-tail hem.
You will need:
How to alter the pattern pieces:
- Cut/trace both front and back pattern pieces in the longest length. The front will be cut on the “straight hem” line and the back will be cut on the “drop hem” line.
- Remember to take into account that there is a 5/8″ hem included in these measurements – whatever you draw will end up 5/8″ shorter when hemmed.
- I already knew that I liked the straight hem dress length, so I used the drop hem length on the back pattern piece as the length for the drop shirt tail. I wanted the top of the hem where the side seam comes together to be a bit shorter than 1 1/2″ above the straight hem length. Draw a 5/8″ wide line at that point on your back side seam, measuring up from the straight hem pattern line. The 5/8″ line gives you room to sew the 5/8″ side seam without stitching into your hemming area.
- Use your curved ruler to draw a curve from the right side of your 5/8″ line (Step 3) down to the drop hem pattern line. Or you can draw it by eye using the curve in the photo as a guide.
- Cut your pattern on the new line.
- Place the Front pattern piece on top of the back pattern piece. It will match from the underarm down to the hem. (The shoulder is a bit higher on the back.)
- Trace the bottom of the back hemline onto a new piece of paper. Also trace the bottom of the front hem.
- Cut the extra paper along the back drop hem line. Place it underneath your front dress pattern piece, matching the traced line so it is correctly placed. Tape. Fold up or cut off the left corner of the original dress front so the new line is visible.
- Now we need to shorten the front hem, creating the “drop” at the back. Draw a straight line at your new height, parallel to the straight portion of the drop hem line (furthest on the right). I drew mine about 2″ up. Cut along the new line.
- Place the cut piece along the bottom of the cut line as a guide, and draw a new curve.
- Cut the front hem line along the new line.
- Cut your fabric using the new pattern pieces.
How to stitch the new hem:
- Follow all directions (up to the hemming instructions) as per the pattern when stitching the dress except when stitching the bottom of the side seam. Leave 5/8″ un-sewn at the bottom of the dress. Make sure to iron your seam open and finish your seam allowances.
- When you get to the hemming instructions continue on here instead. Baste from one side seam to the other along both dress front and dress back hemlines with a 1/4″ seam. Leave long tails at either end of these separate basting lines.
- Press the hem up 5/8″. Pull the long threads (as if you are gathering the fabric) to help ease in and curve the fabric along the hemline. Make sure your curves are neatly pressed, use lots of steam.
- Fold the raw edge under to meet the pressed edge of your hem. Iron again, pin if desired.
- Stitch along the upper edge of the hem, about 1/4″ away from the bottom of the hem. Curve the corners up to a point at the side seam, then continue down the next curve until you have stitched the entire hem.
Enjoy your new dress! And if you have any questions please contact me by email: sherri@threadridinghood.com
** This is a sponsored post and the fabric for the Staple Dress was provided to me at no cost by Fabric Spark. However, as always, all opinions are my own and I will not promote something to you that I do not love myself. **