by Sherri Sylvester | Aug 18, 2014

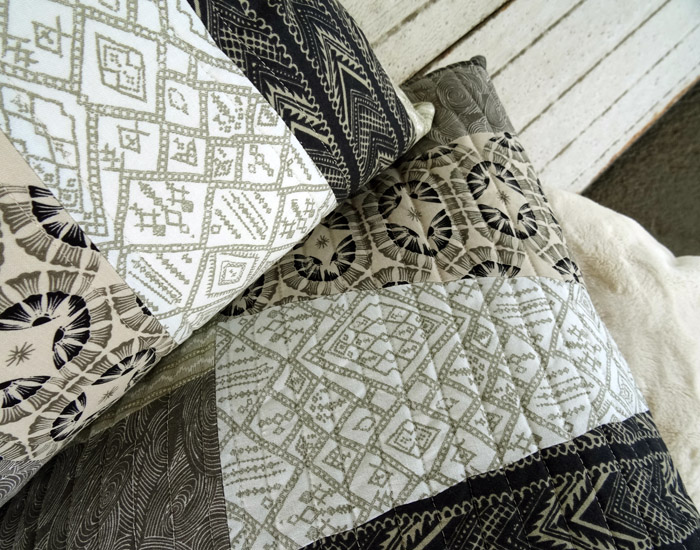
A few months ago I was asked to work on a new Sew Mama Sew tutorial using the latest Parson Gray collection, Empire – from Warp & Weft. I know I always rave about the fabrics I get from Esmari, but seriously – these are gorgeous! I’m hoarding my scraps until I get the perfect project to use them with. My husband even walked by and commented on how much he likes them. (Hint, hint – they’re great for anything manly you have lined up to sew!) You can get the full tutorial with printable pattern piece at Sew Mama Sew.
I decided to make a pieced and quilted 18″ pillow tutorial using a shape I’ve been storing away in the back of my head since the spring. It’s very simple, so it allows the beautiful designs to shine through. These fabrics are an amazing mix of taupey-gray, cream, white and black. I’m especially in love with the hand-drawn look of these prints. They are so earthy and organic. It’s a nice break from the crispness we are used to from most available quilting fabrics. Esmari has stocked yardage in the prints I’ve used for these pillows, and she has other colour-ways in fat quarter bundles as well.
I really love how these turned out, and they look amazing in my gray and yellow bedroom. It helps to have fun outdoor photos too – so I came up with the “great” idea to take our chair, side table and faux fur blanket out to an amazing giant loading door near our house. (Maybe a tad last minute, as usual.) My husband was kind enough (of course, as usual!) to help load everything into the trunk of our SUV as I gave my un-necessary reminder “not to get the -insert-sewn-item-here- dirty”! I’m so fortunate that he goes willingly along with my crazy ideas!
I am also aware of the fact that I asked you all about my sewing machine decision and then didn’t follow up right away. Problem is, I am still very torn about what to do, and I haven’t had a lot of time to take a look at any machines of the serger or sewing machine variety! I so appreciate all of your comments, and, since a serger seems to be winning the race I am going to researching them seriously. Still, in the back of my head, I wonder if I could be more productive with a tad-more advanced machine… So – I guess I am still in the same place you left me last time. I think, once school starts in two weeks I will take a day or so out to make a decision. I can’t wait much longer or I’ll have to call it a Christmas present!
** I was given this lovely fabric by Warp & Weft to make this tutorial, and as always all opinions are mine.
by Sherri Sylvester | Aug 14, 2014
I was so excited to get an email from Elegance & Elephants owner Heidi a few months ago. (Maybe you’ve heard me talking about her Bohemian Babydoll Dress/Top pattern (affiliate link) once or twice… ha!) She was asking if I would like to be part of her “Knock it Off” series… and I didn’t waste a minute signing up. This series is so much fun, and I’ve been following it along for a few years now. The idea is to take a clothing item found in a store – usually one at a ridiculous price you wouldn’t pay – and “Knock it Off” – self-explanatory!
When I found this Hartstrings dress I knew it was the one I wanted to make. First off, it’s made of Ponte di Roma double-knit and I’ve been looking for an excuse to work with this type of knit for a while now. I love the navy and white and simple lines – a ton of retro style. The pockets have vintage gold buttons from my husband’s grandmother and there’s a tiny pop of red in the back elastic closure in the back. There is no way I would pay the (regular price) $60 to buy it for my kids, even if both of them were to wear it, I couldn’t justify the cost. Instead I have knocked it off for around $10, if you don’t include the vintage buttons and interfacing I found in my sewing stash.
I decided to use Dana’s First Day Dress pattern again for this dress. Which coincidentally looks nothing line the empire waist party dress I made my youngest for her birthday last week! Just goes to show how you can use the same pattern and alter it to come out with radically different results. For this dress I cut a size 5 with a size 10 length, since the A-line option is a little shorter than I wanted. I also added a peter pan collar and gathered sleeves with a banded hem.
Just in case you feel like joining in and knocking off something yourself – come sew-along and add an entry to the Knock it Off Flickr group before the end of the series. Two prizes will be awarded at random and they’re good ones – You could win a $100 or $50 gift certificates to Gold Star Tool! If nothing else, go check out the amazing garments everyone has created.
Ready to make your own Necklace Dress?
You will need:
- Ponte de Roma double-knit in Navy (outer and full lining – see A-line Dress pattern option for yardage)
- Ponte de Roma double-knit in White – aprox 1/4-1/2 yard for collar and faux pockets
- elastic & button as per the pattern insructions
- knit interfacing for the collar and pockets
- tailor’s chalk or other removable fabric marker for dark fabrics
- white fabric paint
- small round objects for painting dots (ie. marker, pencil eraser)
- freezer paper and/or pattern drafting paper
- ballpoint needle for sewing knits
- matching white and navy thread
Please Note: I did not line this dress and I wish that I had, since the knit is a little bit thinner than I would like and the construction would have been much simpler… So I’m going to write the directions as if I had, since how to sew a knit First Day Dress is on the MADE blog and I won’t be posting photos of those parts of the instructions anyhow.
When you have finished cutting all of your pieces they will look like this.
Cutting your Fabric:
- Main Dress: Cut 4 A-line Dress pieces from navy according to the pattern. The direction of most stretch should be from side to side.
- Sleeves: Cut 2 navy sleeves (these will not be lined). The direction of most stretch should be from point to point. Place the pattern piece 1″ away from the fold when cutting to leave room for the gathered sleeve.
- Sleeve Bands: Measure the “hem side” of the sleeve pattern and double the measurement. Now subtract 1″ – this is how long you will cut the sleeve band. Cut 2 white sleeve bands that are 2″ wide by this measurement. The direction of most stretch should be along the length of the rectangle.
- Faux Welt Pockets: Cut 2 white pocket pieces 2″ high by 5″ wide. Direction of most stretch should be along the short side of the rectangle.
- Peter Pan Collar: (A) Draft a collar according to these helpful instructions. Before you draft the collar, trace the top of the dress front/back and measure 3/8″ to the inside all of the way around the shoulder, neckline and sleeve to remove the seam allowance. Now draft the collar and add the seam allowance back in. I overlapped the edges about a third of an inch (3/4 cm). (B) Cut 4 collar pieces, making sure you mirror two of them.
Prepping your fabric:
- Interfacing: (A) Match the collar pairs together so there are two for each side of the dress. Interface one of each set. The interfaced side will be the under collar. (B) Fold each of your pockets in half lengthwise and interface the lower half (under the pressed centre line) of each one.
- Sleeve Band: Press each rectangle in half so the long raw edges come together (lengthwise). Press well. Fold again so the short raw edges come together. Press to mark this centre point.
- Mark the Pocket Placement: Fold the front of the dress in half from side to side and press to find the centre. Mark two 4″ lines at approximately hip length – or just below the middle of the dress. These lines should be about 2″ away from the centre line of the dress. This measurement will change depending on the size of the dress you are making, so take this into consideration as well.
Painting the pearls:
Find some objects that you can use to stamp/paint the pearl necklace. I used the end of a washable marker and the eraser from one of my daughter’s pencils. The contrast between the two sizes added a bit more depth to the necklace once it was finished. I was going to use the white paint pen, but didn’t end up needing it.
- If you have it, press freezer paper to the wrong side of the top portion of the dress to reduce movement while painting – try not to press away centre line.
- Draw the general curves of the necklace onto your dress front. Use the pressed centre line to centre the necklace and the pocket markings to reference length.
- Dip the end of your largest object in the fabric paint – I usually put mine on a small lid or piece of parchment paper – and test stamp it on a scrap of fabric. Find how much paint you need and then begin stamping the necklace. Once you have finished the large beads, put the smaller ones on top. After one layer of paint my necklace looked like this:
- Once the first layer is dry, add another on top of each “bead”. Keep letting it dry and adding layers until you are happy with how it looks. I used 2 layers of paint on the large beads and 3 layers on the smaller ones.
Sewing the Collar:
Note: Please ignore the elastic and finished back opening in these photos. You will finish these later when you fully line the dress.
- Place two collar pieces right sides together. You will have one collar and one interfaced under collar. Stitch them together with a 3/8″ seam, do not stitch the neckline.
- Trim the seam allowance to approximately 1/8″ and cut the corners to reduce bulk.
- Turn the collar, make sure to push all seams and corners. Press well.
- Stitch the dress shoulder seams together as indicated in the pattern.
- Pin the collar to the dress neckline – the interfaced under collar is right sides together with the dress front. Make sure the front of the collar is at the centre front and the back of the collar lines up at least 5/8″ away from the centre back.
- Baste the collar to the dress front with a 1/4″ seam. The neckline will be properly finished later on in the tutorial.
Sewing the Faux Welt Pockets:
- Fold each pocket piece right sides together. Stitch a 3/8″ seam on each side.
- Trim the seam allowance to approximately 1/8″ and cut the corner to reduce bulk.
- Turn the pocket right side out and press well.
- Align the raw edge of the pocket with the pocket line marked earlier.
- Stitch across the raw edge of each pocket with a 1/4″ seam.
- Press the pocket upwards, enclosing the raw edge.
- Top stitch the sides and bottom of the pocket close to the edge.
Sewing the Sleeve:
- Line up the centre of the sleeve band with the centre of the “hem side” of the sleeve. Raw edges are together. Next, match up the ends.
- Stretch the sleeve band to find the centre point between each set of pins and pin the band to the sleeve again. Continue adding pins until you are comfortable sewing the band to the sleeve.
- Stitch along the pinned edge with a 1/4″ straight stitch. Stretch the sleeve band to fit the length of the sleeve between stitches.
- Press the seam towards the sleeve.
- To gather the sleeve, mark the armhole side of the sleeve approximatly 3″ away from the centre on each side. Stitch a line of basting stitches between the two marks. Pull the threads to gather each sleeve until it is about the same size as the pattern piece.
- Pin the sleeve and stitch it to the dress front armhole, as indicated in the pattern instructions. You will only have 1 sleeve layer, because these sleeves are not lined.
Finishing the Dress:
- Add the lining, finish and hem the dress according to the pattern instructions. Make sure to watch out for the collar when stitching the neckline so you don’t accidentally sew over it. I would suggest hemming the lining and outer dress together to make it less awkward to put the dress on.
- Attach the faux pocket buttons. I stitched them through to the inside of the dress so the pocket would sit flat and not be weighed down by the button.
- To finish the collar, roll the lining down into the dress slightly (about 1/16″) and use matching thread to top stitch all of the way around the neckline of the dress, about 1/8″ under the collar. This will help the lining not to show when the collar is being worn.
Congratulations – you’d successfully saved yourself $50 by knocking off a really cute dress! Enjoy!
by Sherri Sylvester | Aug 12, 2014
My youngest turned 4 a few weeks ago, and her birthday party was on Saturday. I have no idea how she got so big. She’s even starting junior kindergarten in a few weeks… I’m pretty sure there are going to be more than a few rough days at the beginning of September around here… and not for the kids.
This little monkey has grown up so much, even in the last few months. She has opinions on everything. Especially if something has not been put back in “the correct” location, or isn’t being done in the most efficient manner possible (according to her, of course). She loves to tell you about it in properly worded descriptive sentences – and usually more than one sentence is required! She loves to make you laugh, and is our cuddly one. Of course, she’s the mischievous one too, keeping us on our toes! I hope she will always keep her fun-loving attitude (and the cuddles… please let her keep the cuddles…)
I’d promised her that she would have a new party dress to wear, so I went searching for possible patterns and printed a few pictures out so she could pick. She chose the First Day Dress made by Dana from Made, purely on the twirl factor I think! I’ve been hoping to pick it up anyhow, and I’m so glad she chose it. It’s a well thought out dress and it’s wonderfully easy to work with as a base pattern for your own alterations. Dana, as usual, has written very descriptive and fun to read instructions. And there are lots of photos throughout. The skirt is almost a full circle, providing lots of room for spinning without the need for any gathering (hooray!).
I altered the dress a bit, adding an empire waist and a sash – because every party dress needs a sash! Since the swing dress option has straight sides on the bodice, it is easy to shorten it into an empire waist. No matter where you cut the bodice shorter, the skirt will always be the correct size to fit the bodice pattern piece. I measured my daughter to see about how long the bodice should be, added a little for the seam allowance at the neckline and bottom of the bodice, and then cut the bodice straight across. Since I removed quite a bit from the bodice, I cut the skirt at the size 10 length and it worked out perfectly. I love empire waists on little girls!
The sash is extra wide, so I gathered the ends (like the oliver & s Fairy Tale dress) and inserted it when I was stitching the sides of the outer dress. I think I could have made it tie in a bow – but it was a tad too short at 24″ each, so I used a knot instead. I think 36″ long each would have been perfect… note to self for next time! The skirt fabric came from Fabric Spark (still available here) and I bought it back in the spring when I interviewed Daryl for the Canadian Online Fabric Store series. Of course, even though I had it that long ago, I waited until last Thursday to sew it up – as per the usual! Thankfully the sizing was perfect, and it is a really simple dress to sew.
I also used a different construction method to attach the lining. The instructions Heidi from Elegance and Elephants has written up on how to stitch an outer and lining together comes together much more easily. I think it’s called the “burrito” style of stitching it up. To do this, finish the neckline and back opening of the dress completely – top-stitching included. Then attach the sleeves and stitch the arm holes as per Heidi’s instructions. To stitch the side seams together, match the right sides of the outer and the lining and stitch each side of the dress with one long seam. This method has a nicer finish than ironing the edges in and then stitching them together.
How do I finish a post up about my little girl? I don’t know… right now I just want to keep her little. But of course that’s not an option, so we keep moving ahead and pray for her to grow up into a strong, amazing woman. And meanwhile, enjoy the hugs and the little hands holding ours… (is the screen blurry, or is just me…)
by Sherri Sylvester | Aug 11, 2014
Thanks for reading! Follow along to get more great tutorials and posts:
I always try to make a little gift to send home with the kids at my daughters’ parties. There are quite a few opinions out there about take-home party gifts. I’ve read many a blog post about the merits of sending home items that will be used, provide entertainment and won’t get thrown out within a few days. So, my aim has always been to try to find something useful, and home-made. I am lucky because I have fun doing it, and I generally have the extra time it takes to make a handmade gift happen. One year it was homemade playdoh and cookie cutters. Another year they all got one of these beach towels. I think I also made bath crayons and wash cloths for everyone another year. This year I knew I was not going to have a lot of time, so I spent quite a while thinking about something fun that would be fast and this one is a winner!
I spent about 3 hours total making 13 pencil cases – which averages out to about 18 minutes each – and I know I took a coffee break in there a couple of times! Thirteen, of course, included one each for my kids as well – since you can’t leave them out. Anyhow, I needed the kids to have one for the photo-shoot! The packaging didn’t take long, since my husband designed-up a little 4×6 card to put in with the gift and we included a few fabric markers and a healthy snack. I even enlisted the kids to help me divide the 8-packs of markers into groups of 4. Hooray for help!
It helps to have this amazing IKEA Tidny fabric – because it definitely ready to colour. But, I think it would be fun to search through the Spoonflower library of designs and find something in just black and white that would work well. You could even design your own theme-appropriate fabric! The fabric markers I used get mixed reviews online, and I can tell you that they definitely don’t work on dark colours, but they are great for this project. And, true to the brand, they wash off of little hands just fine… I know from experience!
If you are scared off by the zipper, this project doesn’t even need a zipper foot. I used my regular zig-zag foot for the whole thing. Definitely give it a try! It might even work out to be a good project to make with your kids, since the beginning of school is soon upon us. (Don’t worry, I won’t mention it again.) And it also has a simple french seam on each edge, encasing the seam and providing an easy way to make this an un-lined, and still “nice-looking” pencil case!
You will need:
- 12″ zipper
- 12″ wide by 14″ high fabric – cotton/home decor weight/canvas
- 2 pieces of 3″ grosgrain ribbon
- sewing machine, thread, scissors, chopstick
Here we go:
- Unzip your zipper and lay one side along the top of your rectangle. The zipper teeth are facing down and the top of the zipper is aligned with the left side of the rectangle.
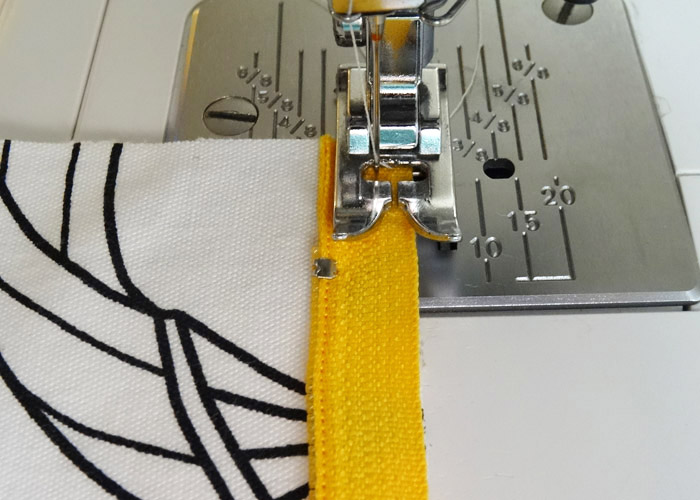
- Pin/Glue if desired and stitch along the edge with an aprox. 1/4″ seam – attaching one side of the zipper to the pencil case. I put my presser foot right next to the zipper teeth and moved the needle to it’s left-most position. (I was extra quick by eyeballing the edge instead of pinning as I sewed each zipper on.)
- With the zipper still unzipped, fold the pencil case right sides together and line up the left side. This helps to line the zipper up so both sides match when you are finished. Pin the second side of the zipper in place and stitch as in Step 2. (I only pinned it once, making sure it was aligned, and then lined the rest of the edge up as I went.)
- Your pencil case should now be a tube. Turn and press the fabric away from the zipper teeth so it lays flat. Be careful not to heat up the teeth too much, so they don’t melt.
- Now press the case again while it is right side out, this time measuring so the zipper is aprox. 2″ down from the top edge. Make sure the raw side edges are aligned, this will ensure the pencil case corners are squared up.
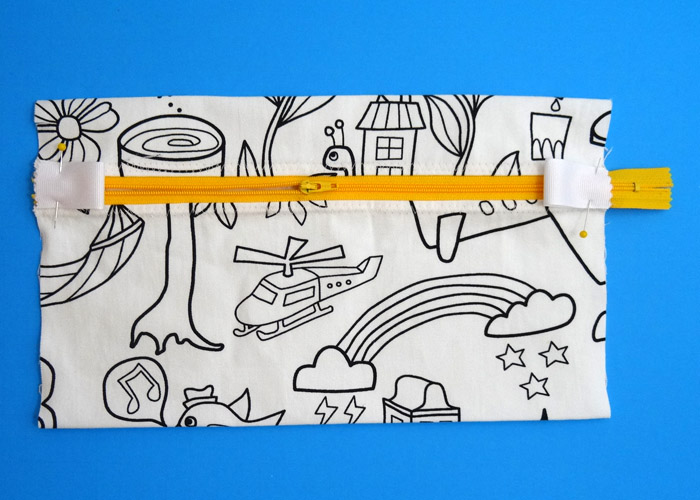
- Open the zipper and stitch a wide zig-zag over the zipper tape and raw edges of your fabric. This is easier when sewn with the right side down and finishes the seam so the fabric will not fray. Fold each tab in half and pin them centred beside each end of the zipper.
- Keep the case folded right sides out and stitch along each raw edge with a 1/4″ seam. Catch each tab in the seam as you go, and make sure to watch for any metal parts of the zipper so you do not stitch into them.
- Make sure everything is well aligned and cut off the excess zipper.
- Turn the pencil case right sides together and use a chopstitck or similar object to push the corners out. Stitch a 3/8″ seam down each side, enclosing the previous seam and the tabs. (Your french seam is done! Easy, peasy!)
- Turn your pencil case right side out and give it a press. All done!
If you have any questions I’d love to help – you can email me: sherri@threadridinghood.com or contact me on Facebook, Instagram or Twitter.
I’d love to see your creations! You can share your projects on Twitter and Instagram @sherrisylvester with the hashtag #alongforthreadride or #threadridinghood, or post them on the Thread Riding Hood Facebook page.
This tutorial is for personal/charitable use only. Thank you!
by Sherri Sylvester | Aug 6, 2014
Hi! This post contains affiliate links. If you purchase items through the links below, I receive a small percentage of each purchase. Thanks so much for your support!
I love the Bohemian Babydoll dress pattern so much I’ve made 3 of them already and I’ve got a 4th cut out! When I pattern tested it, I was smitten with the high-low bodice and hem, and the girls love how easy and pretty it is to wear. Each of the last 3 I’m sewing have a tutorial attached to them, so you’ll be seeing a few more soon.
This dress, honestly, is in my top 5 favorite things I’ve sewn. I love the Heather Ross, Lilac Frog Pond skirt fabric I found at Modern Bee this spring. They are one of my favorite local quilt shops and I posted a review of their old location under their previous name, last year. (They now ship within Canada and the US!)
These photos are from another Quebec photoshoot, at the Fontaine de Tourny in front of the Parliament Building. I’m not certain we were allowed to stand in the fountain, but it sure was fun (and a bit cold…)! It was a gorgeous day out with great weather. We walked from here, through the old city and made some fun memories we could bring home with caricatures we had drawn of the kids.
Seems this pattern is all over the internet, it’s lovely and simple to make, just Google it to see all of the options. I made this version without the flutter sleeves, so it was extra quick. Elegance and Elephants has quite a few patterns on my to-do list, including some free ones at the bottom of the purchase list! I’m excited to be participating in her Knock it Off series that’s running right now, so you’ll see my knock-off next week!
Ready to add-a-bow to your dress?
You will need:
- a square of fabric 7″ wide by 7″ high for the bow
- a rectangle of fabric 3″ wide by 4″ high. for the centre of the bow
- thread
- bohemian babydoll pattern (or other pattern where the outside bodice is attached last)
Before going ahead with these steps, follow your pattern instructions until you get to the place where the lining is fully attached and the outside bodice is being attached to the skirt from the outside.
Step 1: Fold the bow fabric and bow centre fabric in half as shown in the photo.
Step 2: Stitch the raw edges of the long rectangular bow centre with a 1/4″ seam. Stitch the two short edges of the bow fabric with a 1/4″ seam. Clip the corners to reduce bulk when turning.
Step 3: Turn the bow and bow centre through the openings. Press flat, making sure the edges and corners are pushed out properly.
Step 4: Pin the edges of the bodice to the skirt, leave a gap at the dress centre front that is about 9″ wide. This is where the bow will be sewn in. Find the centre of the bodice and the centre of the bow rectangle. Pin the bow centre at the centre top of the skirt, with the bow rectangle over it, matching the raw edges of the bow and bow centre with the top raw edge of the skirt. Be sure to centre everything on the dress.
Step 5: Bring the bow centre up around the bow rectangle to create a loop and pin it. Adjusted how tightly the bow is wrapped to what you like, but leave it a little loose so the bow centre can be sewn down in the last step. Trim any excess from the bow centre.
Step 6: Pin the bodice over the bow, aligning all raw edges of the bow, bow centre and skirt top edge when pinning.
Step 7: Top-stitch the bodice to the skirt as indicated in the pattern instructions. This encloses the raw edges and attaches the bow as well.
Step 8: Push the bow up within the bow centre loop and pin the bottom of the bow centre to the dress skirt.
Step 9: Top-stitch along the bottom of the bow centre loop to attach it to the dress skirt, and you are done!
I hope you like this little way to add your own pretty details to a pattern. And of course, I’d love to see your creations. You can share your projects on Twitter and Instagram @sherrisylvester with the hashtag #alongforthreadride or #threadridinghood, or post them on the Thread Riding Hood Facebook page.