by Sherri Sylvester | Apr 22, 2014

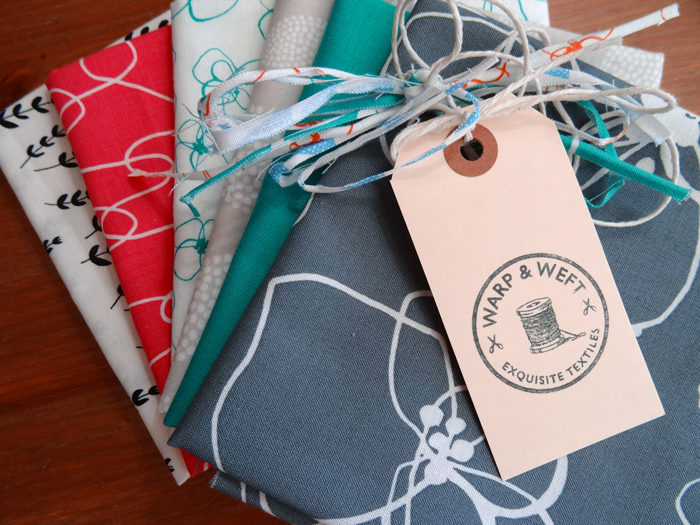
I’m so excited to be part of the Warp & Weft Sewing Society’s first ever blog hop this week! We were all given a 6 fat quarter bundle of Lotta Jansdotter’s new (gorgeous!) collections Mormor and Sylvia. The challenge was to make something that celebrates Spring. You can get your hands on some of this amazing fabric by entering the giveaway at the end of this post – 12 Fat Quarters of Lotta Jansdotter goodness! **Update: The giveaway is now closed.
I had so many ideas for this challenge, most involving quilts – but, since many of the other Sewing Society members are talented quilters I supposed I should choose something else! In the end I decided a new spring tote bag was the way to go – because you can never have too many bags! The bright, springy bundle Esmari expertly mixed for me is so light and happy, that I decided to share and make 3 totes. A Mommy and Daughters trio! (This post was getting a bit long, so the Spring Market Tote tutorial is coming up tomorrow! *Update: The Spring Market Tote & Mini Tote Tutorial is here.)
I wanted to make something striped that could feature each of the prints in my fat quarter bundle and was inspired by the beachy rope handled totes I was seeing online. It was great when the prints came together into a tote that is a bit more formal – perfect for shopping! The large size makes a very roomy bag, and I tried to duplicate that by making the girls’ mini totes oversized as well. They were able to fit all of their (self chosen) shopping necessities with them. It was fun to see them excited to feel “all grown up” with their own matching totes!
I had fun trying to find rope that I liked in an appropriate thickness for the totes. With my pre-made options exhausted, I bought some braided cotton at the hardware store and made my own rope! A 4-strand round braid is actually very simple to make and I’m really happy with how it looks. The grommets are fun even though it was momentarily terrifying to cut holes for them in my perfect “finished” bag! They turned out so well I think I’ll have to do it again!
The tote is made with a quilt-as-you-go technique so the outer comes together really quickly. Inspired by my Noodlehead Cargo Duffle I layered quilting cotton, low loft batting and canvas. It holds it’s shape really well, and the interfaced reinforcement strip at the top of the bag folds over to easily install the lining. There is a small pleat on the ends of each oval base, making it simple to fit the outer perfectly to the circumference of the base. And I love how it gives the Spring Market Tote a little more shape.
I would like to thank Esmari especially for choosing the perfect bundle for me! The Slate Blomster is my favorite print in the Mormor collection, my oldest loves pink, and my youngest’s favorite colour is green – so the emerald was perfect for her. Win-win all around. I split up the girls’ totes to accent their favorite colours, while mine includes all of them together – lucky me!
**Update: The Giveaway is now closed. ** You can win 12 Fat Quarters from Lotta Jansdotter’s latest collections, Mormor and Sylvia! In order to enter this Giveaway please follow the Rafflecopter instructions in the widget below and leave a comment on this post. You can obtain 7 entries in total by leaving a comment on each participating blogger’s Lotta Jansdotter Challenge post.
a Rafflecopter giveaway
I’m second on the blog hop this week – be sure to check out the kick-off post! The quilt Esmari posted yesterday on the Warp & Weft blog is gorgeous. The fabrics look amazing on a white background with the coloured thread she chose. Carla is coming up tomorrow and her work is impeccable, I’m so excited to see what she’s going to post!
Esmari – Warp & Weft: April 21 ** blog kick-off yesterday!
Sherri – Thread Riding Hood: April 22
Carla – My ½ Dozen Daily: April 23 ** tomorrow’s post!
Shannon – The Finished Garment: April 24
Cathy – Blueberry Patch: April 25
Cynthia – cynthiaf: April 26
Lysa – Lysa Flower: April 27
Winner to be announced here on the Rafflecopter widget: April 28th
I hope you like the totes and come back to check out the tutorial! It’s really simple in its construction – and if you want to get some Lotta to make your own you can find it at the Warp & Weft shop – I know you need a new Spring Tote! Be sure to get all of your entries in by following the blog hop around, I’ll see you at Carla’s tomorrow!
** Please note: This is a sponsored post and the fabric was provided to me at no cost by Warp & Weft. However, as always, all opinions are my own and I will never promote something to you that I do not love myself. **
by Sherri Sylvester | Apr 17, 2014
In lieu of a quiet book post tutorial today, I thought I would start something new! I’ve noticed quite a few events happening in blogland. Seems everyone is collaborating with each other to create more and more sewing contests, sew-alongs and sales. Things like Project Run and Play and Kids Clothes Week are great places to collaborate and sew “together” with other like-minded individuals!
As I added them to my paper calendar I thought that there should be a better way to keep track of the many opportunities there are available. Not to mention the giveaways, link-ups and contests that go along with them. So, I did what every other like-minded individual is doing when keeping track of the interweb, I started a new Pinterest board of course! The “Sewing Events” Pinterest board will contain all of the events I run across as I get to them, and I will do my best to keep it updated properly. Here are just a few things that are already happening or coming up…
Elegance and Elephants is hosting a new series where you sew something for your kids. The catch is that they pick the fabric, outfit and accessories! I’d love to see what my girls would come up with, so I’m hoping to play along. You can link up your projects from May 1st to 9th. There are even 3 prizes to be awarded on May 11th.
The Spring Top Sewalong has been going since 2009. The concept is that you sew something for yourself for spring, because you need a few new things to brighten up your wardrobe right?! Link up your photos in the provided Flickr pool, and could be featured on Rae’s blog as well. The Spring Top Sewalong started this Monday (14th) and will finish up on May 11th.
Need an excuse to sew for yourself? I know I always get caught up in sewing for my kids and my projects get put on the back burner. Here’s your permission to sew for yourself.
Selfish Sewing Week happens from April 28th – May 3rd. Conveniently right in the middle of the Spring Top Sewalong, so you can enter both at the same time. Sounds good to me!
This one is my favorite of them all! The Sew Fab Pattern Sale is an amazing deal if you like to sew for kids and for yourself. The sale happens twice a year – the spring bundle this year starts May 5th and only lasts 1 week! I bought the Spring and Fall patterns last year and they are not to be missed. The sale is comprised of many indie designers’ patterns at a deeply discounted price. I can’t wait to see what is in this spring’s bundle!
What are you participating in? Let me know and I’ll see if I can add it to the Pinterest board. The more events the better!
by Sherri Sylvester | Apr 15, 2014
Well, I managed to get 2 things finished for Kids Clothes Week. 1 Pair of Jeans and a dress. Argh! I felt a bit like I was wandering around in slow motion last week. But – they are finished and I’ve started on the second Easter dress. So we are getting somewhere!
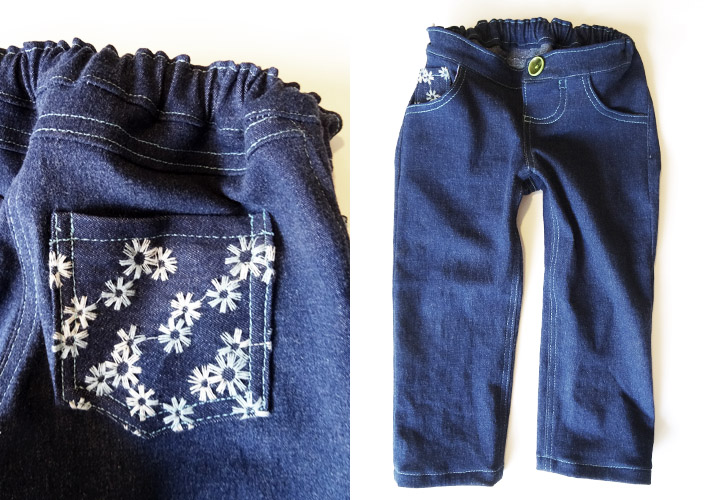
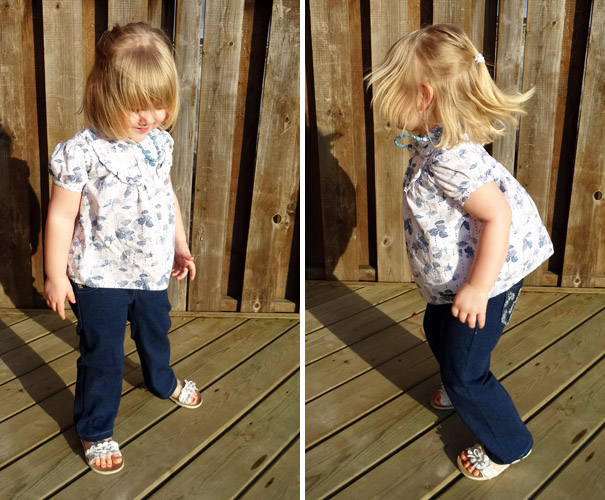
I have wanted to make my youngest some jeans for a while. She wants to “match mommy” but her proportions make it hard to find a properly fitting store-bought pair. So I thought I’d give the PeekABoo Patterns Skinny Jeans (affiliate link*) a shot. I’ve had this pattern since the Sew Fab Fall Pattern Bundle, so it was nice to have it on hand when my daughter started asking! This is also the main reason they have a “random” green button on the fly. Everything she loves must have green on it!
The details and instructions in this pattern are great. It went together well and the top-stitching and mini-pockets are so cute. It even includes instructions for using button elastic for an adjustable fit. I used some stretch denim that I already had on my shelf – destashing, hooray! I added pockets in an embroidered denim that I bought on a deep sale a few years ago. I have no idea what I will ever use the rest of the embroidered denim for – there’s about 2 metres of it and it’s super flowery. Thankfully it looks great in small doses!
When I sized the jeans I was torn about how to go about making them. My daughter has a size 4 leg length and a size 6 or so hip/thigh. In the end I decided to make a size 6 and re-work the next pair. I’m glad I did. Otherwise I would be so disappointed! They are pretty big on her – so the back elastic gathers quite a bit, and the rise is a bit high at the front. I know it was a lot of work to top-stitch everything and finish it properly, but I didn’t want to make a muslin, so here we are!
I think the next time around I will make a size 4 with a bit lower front rise and bit higher back rise. I tried them on my six year old (who flat out refuses to wear jeans – no help there!) and the rise fit really well – so it is definitely not a pattern problem.
The only thing I changed was the method for hemming the back and mini pockets. I much prefer to turn the top edge of the pocket rather than fold it under twice and hem it. The edges turn out a bit cleaner. Here’s how I finished my pockets:
- Fold the hem to the wrong side by 1/4″. Fold the hem to the right side by 1/2″. Stitch around the sides and bottom of the pocket with a 1/4″ seam – to attach the top hem and mark the fold lines for the rest of the pocket. Clip the top edges of the pocket to remove bulk before turning.
- Turn the top of the pocket inside out and press. Turn and press the sides and bottom edges to the wrong side following the seam lines you made. Finish the pockets, hemming the top edge and stitching the others as indicated.
Overall I’m happy with the little details on the pants. The pattern includes super tiny cute belt loops as well, but when I made the pants too big I decided not to spend the time stitching them on. Either way – my youngest was quite upset that I even tried to get my oldest to wear them as capris instead and has now claimed all rights to them. We will have a bit of a saggy bum when she wears them unless I decide to take off and redo the rise and waistband. It’s almost worth it, but I think I’d rather start over. What would you do?
If you want to get the pattern you can find it here: PeekABoo Pattern Shop Skinny Jeans (affiliate link*). Thanks!
*This post contains affiliate links, which means that I receive financial compensation for any sales made through these links. I bought this pattern and made the jeans before I found out there was the possibility of compensation for the affiliate link.
by Sherri Sylvester | Apr 13, 2014
Oh, I’m so behind this week with everything due to my wanting to sew for Kids Clothes Week last week – and I don’t even have much to show for it yet! I think I will be posting some of what I made this week. Today, though, I am posting the tutorial for the first option of two Mini Photo Album pages. Before you begin, get the shopping list for these photo albums and find all of your materials.
You Will Need:
- small safety pin
- matching thread
- glue stick or basting spray
- washi tape or teflon foot for your machine (used to sew the vinyl)
- your normal sewing gear, including a ruler, iron and removable fabric marker
Before we begin/Important Notes:
- When you are sewing this book it is good to remember that some of the edges will be covered after the book is completed and sewn together. 1/2″ on the top edge of your page and 3/4″ on each side edge will not show in the final project.
- Remember to use your iron liberally when you are sewing this book. It is going to be a work of art when you are done! Since it is thick and some of the pages will not be iron-able once you are finished with them it is advisable to take all of the care you can to remove wrinkles so they are not accidentally permanent in your final book.
Here We Go:
- Background Prep: (skip this step if you are using a one piece background) (a) Lay your 3 background pieces together in the order you would like. Place the top piece on top of the middle piece right sides together. Stitch across the top of these pieces with a 1/4″ seam. Iron the seam open. Place the bottom piece right sides together with the middle piece. Stitch across the bottom of these pieces with a 1/4″ seam. Iron your seam open. See photo below for a front and back view of your finished sky. (b) Press the 9″x9″ piece of medium fusible interfacing onto the back of your finished background following the manufacturer’s instructions.
- Make the Pocket: (a) Iron the pocket interfacing onto the back of your outer pocket. Press the top of each pocket under by 1/4″. Pin pocket outer and lining right sides together. (b) Stitch around the sides and bottom of the pocket with a 1/4″ seam allowance, leave the top open. Clip the corners and turn the pocket right side out, push out the corners neatly and press. (c) Mark and stitch your top-stitching. Pin and stitch along the top of the pocket to close the opening. (d) Pin the pocket to the centre of the background and top-stitch the sides and bottom edges of the pocket. Set your pocket aside.
- Finish the Pocket: (a) Pin your 8″ ribbon 2 1/4″ up from the bottom of the page. Make sure it is centred left-to-right. (b) Stitch the ribbon across the bottom. I used a zig-zag stitch. (c) Pin the pocket over the ribbon in the centre of the page background. (d) Stitch the pocket to the background. Stitch close to each side and bottom edge, leaving the top open.
- Album Cover: (a) Apply interfacing to the wrong side of the album outer and lining. (b) Pin outer and lining right sides together. Mark a 2″ opening on one short end. (The opening is between the 2 pins on the right short side in the photo.) (c) Stitch around the album cover with a 1/4″ seam allowance beginning and ending at your opening marks. Clip all corners. (d) Iron down 1/4″ on each side the end with the opening. (e) Glue or use basting spray to place your batting inside of the stitching lines on either end of the album cover. You are placing these on the wrong side of the fabric and interfacing. (f) Turn your cover through the opening, keeping the batting in place. Push out the corners and press the outer flat. Match up the opening and top-stitch around the edge of the cover, this will also close the opening. Stitch to quilt as desired.
- Vinyl Pages: (a) Fold each piece of vinyl’s short ends so they almost meet – making the total height of the vinyl piece 3″. Keep them folded by using a piece of masking or washi tape. Do not pin through them because pins will leave a permanent hole in the vinyl. (b) Stitch along the sides of the pocket. The fold is at the bottom, leave the opening at the top un-sewn – this is where you will place your photos. TIP: When stitching over vinyl, it tends to stick to your presser foot making it almost impossible to sew properly. You can use a teflon foot to help the machine to slide over the vinyl. Or you can place a piece of washi tape on the bottom of your presser foot. (c) Mark the centre of your album cover. Line up all photo pages and pin them to the album centre line at the top as close as you can to the to edge of the vinyl. These holes will be permanent. The fold of the vinyl page will almost line up with the outer edge of the album cover.
- Finish the Album: (a) Fold over aprox. 1/4″ at the end of your ribbon. This can be pinned or adhered with a glue stick. (b) Fold your album in half, like a book, with the pages pinned inside. (The two pins sticking out of each side in the photo are holding the vinyl pages.) (c) Fold the ribbon over the centre edge of the album. You should have aprox. 1/2″ on each side of the cover’s fold. (d) Stitch through the cover, aprox. 3/8″ from the folded edge. Stitch between the seam and the folded edge with a zig-zag stitch to add extra-strength. Make sure the stitching has gone through both sides of the ribbon at the fold and that all vinyl pages are secure.
- Attach the ribbon tag to the side of your page with a safety pin for safe keeping. Place your photos in the vinyl pockets and you are finished!
You have just finished your third page! Post it on
Flickr so we can see it – or check
this page for more quiet book sharing ideas – Pretty please? I’d love to see what you are making!
by Sherri Sylvester | Apr 12, 2014
I’ve been a tad delinquent in posting the winner for the Facebook Giveaway. And the Fabric Spark giveaway ended last Thursday, so now I can post the last two giveaway winners together! Hurray!
Facebook Giveaway Winner
The lucky winner of the Sunny Glasses Case and Walking on Sunshine Bundle was Emily who has actually bought the Sunny Glasses Case license and is selling it in shops around her area! What fun! She writes an interesting blog called Taea Made if you want to check it out.
Fabric Spark – Thread Riding Hood Fat Quarter Bundle Giveaway
The Fabric Spark winner was Deanna who had to enter on her mom’s computer because hers doesn’t like the entry widget. It was totally worth the effort! She will be getting the fat quarter bundle that I was able to curate myself (yay!) and is on sale at Fabric Spark here.
Congratulations to both winners!