by Sherri Sylvester | Dec 5, 2013

I’ve been fiddling with my website this week and I hope you like the new look. I thought it was time to introduce a more streamlined layout, and I’ve got some other projects planned for whenever my husband can fit them in! I benefit greatly from his ability to work with/alter and re-code WordPress websites. Problem is, I feel bad asking him to do anything here because he’s generally been doing the same thing all day for our business!
We’re busy getting ready for the holidays. Life feels a bit rushed, but thankfully still manageable. I’ve decided to scale down on the handmade gifts this year (EhEmm… I heard your gasp!) so I’m planning a few small things supplemented with purchases, maybe from Etsy? Though I think my shipping time will not allow me to think about that much longer! What are you planning for the holidays?
When my life gets busy I find the need to clean my house to stay sane and I’ve done a lot of that this week so I now have a tidy sewing space that I think I will retire to. I’ve had projects that I’ve been excited about, but unable to get to – almost literally – the floor was covered in fabric! I don’t know about you, but I feel energized in a clean work space – now if it would only fit that way by itself!
I’ve included a few shots of projects I’m working on in this post…. maybe you’ll spot them coming up in the next few weeks. (I hope so or I’m behind!) In the meantime – follow me on Instagram to catch more regular updates – it’s so much faster to photograph than it is to blog! I hope your holiday preparations are going well. What are you sewing?
by Sherri Sylvester | Dec 4, 2013
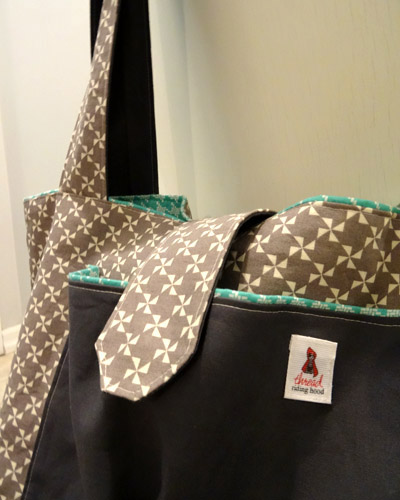
Oh how I wish this bag was mine! But, at least I know it has a good home. My sister-in-law mentioned that she liked my tote bag back in the summer. So I thought I would make her one for her birthday.
The randomness of choosing the fabrics myself didn’t sit well with me. I’m always nervous to choose something for someone because of the amount of work that goes into making it. I think if it was a less “visible” gift (ie. Not used outdoors with actual people around!) I would have not had so much trouble. Since she was/is hopefully going to be able to use it a lot I sent her a few fabric options within her colour choices of gray and turquoise.
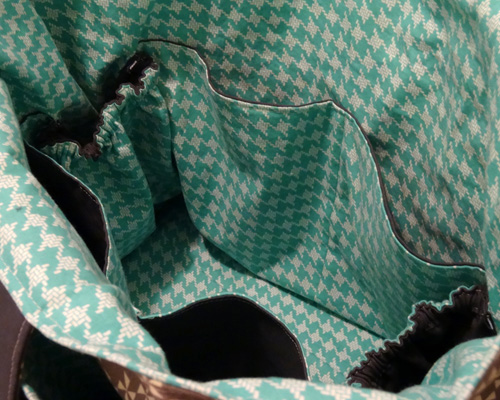
I’m so glad she chose these – they are gorgeous! I may have “accidentally” ordered a 1/2 metre too much in the gray pinwheels… That said, the turquoise houndstooth is hands-down my favorite. Here’s a close up shot of the print – it is actually made up of tiny lines so it looks woven.
As I was making this one I started to regret using the white thread, since it showed a lot in the top-stitching, I had to be super-careful to make sure I was sewing straight! Thankfully when I was done I loved the effect! I don’t think it would look nearly so stylish without the contrasting thread. I also really like the solid base and outer pockets. It is a lot less busy than the previous bags I made. I think if I make another one I will do the same thing. I switched up the pockets on this one as well, and added elastic only at the ends. I use the end pockets on mine for holding the kids’ water bottles. I also added a magnetic closure to the front instead of Velcro – which makes it look a lot more professional.
The pattern for the tote is one that I made using Abby from Sew Much Ado’s Diaper Bag tutorial. I love her design and added a coloured base and some outer pockets to it. So far I’ve made 4 of these and each one has gotten a ton of use. Abby kindly allowed me to post my changes to her bag. You can find the instructions for the tote here, complete with cutting layouts and yardage.
What do you think? Do you have a favorite tote-worthy fabric? How about a favorite tote pattern? I’d love to hear what you think! (Oh, and if you need a Christmas gift idea – this is a good one!)
Fabric Notes: Free Spirit Designer Solid in Manatee, Mama Said Sew Pinwheel in Cream/Mist, Avignon Houndstooth in Blue all from Fabric Spot
by Sherri Sylvester | Dec 3, 2013
I had so much fun making this week’s project last night. And if you follow on Instagram you got a sneak peek! I’ve been wanting to make a Christmas project for a few weeks now – so what better way to start December than to make a Rudolph? I admit, it’s a bit creepy if you think about it – having Rudolph’s head on our wall… but if you don’t think too much it’s ok!
I ran into Elisa’s (Charming Doodle) Deer head tutorial and knew I would have to give it a try. The instructions are really simple – and it is a lot easier to make than I expected. I love Elisa’s flowered version, but knew it would not stay on my wall long if I gave it a try. My husband and I co-make our decor decisions and it would not have made the cut! Thankfully I found some stashed fabric that is perfect, and still gives the same effect. (I think it was destined for a tote bag and there is still some left!) The fabric is burlap-ish with a brown velvet floral design printed on it. If I remember correctly it was an end that I picked up for $2 or $3 in the ends bin at Fabricland.
The antlers are gold dupioni silk. Ridiculous you say? Yes, maybe – but it was the perfect colour! I bought the silk in a hurry a few years (and a lot of sewing experience) ago and made a disastrous shirt project. It’s still sitting in my sewing pile upstairs! Meanwhile I used a few scraps to make these antlers and they match so well. I love the texture the irregularities in the silk gives to the antlers.
Amazingly, I only did two things differently than the original tutorial (hee hee!). When I turned the antlers right side out the first time I did not clip my curves. Because the silk has almost no stretch the tight corners in the antlers were puckered, so I had to turn them wrong side out again and clip my curves. Other than that the instructions are great and very easy to understand. I was a tad fooled by their simplicity, though. Simple does not mean quick for this tutorial! For example, I didn’t realize that the direction, “Turn the deer head right side out and stuff the antlers tightly with fiberfill”, would take me about an hour! The antlers proved to be trickier to fill than I expected – especially since I could not find my chopstick and had to use the end of a pen. The second thing I changed is to make the ears from fabric instead of felt – so I cut them a tad larger and sewed the two (interfaced) pieces together and turned them before sewing them on.
I love how “John” turned out! My husband has named him and I think it fits! He also suggested the faux evergreen wreath around him, which adds lots of character. Now John is ready to greet everyone who comes in our door. And his nose is remove-able so he’s a year-round deer too! If you want to make a tiny deer tree decoration Elisa has posted instructions on how to re-size the pattern – how cute would that be!
What do you think? Are you going to try it or is it too strange or daunting?!
by Sherri Sylvester | Nov 29, 2013
I’m surrounded at all times by amazing fabric. Not only in my own home, but in all of the blogs I read. It’s a work hazard that I am happy to deal with! As a graphic designer I’ve always been attracted to well designed fabrics, they make a project. If the project is amazing, but the fabric is not, it can be seen as less appealing. The same pattern, followed exactly in two fabrics can be completely different and that is part of the reason I love sewing. Things can always be altered and changed. You can add a gathered sleeve, or a hem band and create a new unique piece!
Sewing allows me to be creative. To take some flat pieces of fabric and create something 3-dimensional. These gifts make other people happy and taking the time to create something for them sometimes means more than the use of the item itself. But I’m getting off track…
Back to designer fabrics! When I sit and think about how much my stash is worth, I sometimes wonder if it really is worth buying the “expensive stuff”. I feel wasteful and a bit like a hoarder. Anyone relate?! The other day, however, I was reminded of one reason why I spend the extra cash. I washed the fabrics for Monday’s Sally Dress and accidentally leave them in the dryer for longer than I intended. Here’s how they came out.
The fabric on the right is designer Robert Kaufman fabric. The fabric on the left is cotton at less than half the price. Can you see the wrinkles?! I don’t know how many of you LOVE to iron, but it’s not my favorite. I iron everything when I’m sewing it, but once a garment is finished I like to wash and wear it as much as possible. The designer fabric is so much less wrinkly than the less expensive cotton. I have been amazed in the past when I hang up other dresses I have made, damp out of the dryer, to find the next day that they are virtually wrinkle free. I didn’t make the connection between the fabric quality and the wrinkles. Only problem is… I mixed these two fabrics in the one dress… hmmm…. I suppose I will be ironing the pockets!
That said, a lot of expense is tied up in my addiction and I am working on buying less stash and am hoping to make a few Christmas gifts this year without buying much more than some zippers and thread. Which is totally do-able, I just have to make it work – and maybe cut into those pieces I have been saving for “just the right project”. It is just fabric after all right? (Or maybe not!)
What do you think? I know that Dana from Made rarely (if ever) uses designer fabrics. And we all know how popular her projects are! Do you go for the local sewing store fabrics, or are you addicted to the rush of designer fabrics in the mail (like me!)? Do you think twice before spending the extra cash?
by Sherri Sylvester | Nov 27, 2013
Have you heard of Spoonflower? It’s a printing company located in North Carolina. They print custom wallpaper, decals, gift wrap and FABRIC! You are able to print your own designs – or you can buy a design from their marketplace of amazing designs. I came across the idea to make artwork with their printed linen-cotton canvas a while ago and finally made it happen!
This project is a “no sew” project – amazingly! The design is inspired by a piece of art I saw about a year ago. I love what it says, but had to fight the urge to add “Canadian” to the list of words in my artwork. For those of you who live in Canada I’m sure you will remember the “I Am Canadian” commercial from Molson a few years ago. This commercial is funny mostly because Canadians are NOT like the guy in the commercial. We are generally super quiet about our country – though a little more enthusiasm would likely be good! Anyhow, I didn’t want a beer reference in my daughters’ room – so I didn’t add it in.
Wanna make one yourself?!
Here’s what I did to make my art:
I designed the artwork to fit within a fat quarter of linen-cotton canvas. If you need help with the art, you can check out the Spoonflower helpful-page, which has lots of useful information and suggestions for creating and uploading your artwork. Because the linen-cotton canvas is 54″ wide, a fat quarter is 27″ x 18″. I used a final artwork size of 24″ x 14″ for my art – which left me just barely enough space to wrap the canvas around my 1 1/2″ deep gallery-style stretchers – really it was too little, but it worked! I would recommend using a final size of 22″ x 12″, to give yourself a few inches of wiggle room when stretching the canvas (instead of 1/2″!). If you get the thinner 1/2″ deep stretchers you will have lots of room at 24″ x 14″.
You will need:
- 4 stretcher strips – I found mine at my local art store for less than $3.50 each
- staple gun
- your Spoonflower printed artwork!
- picture hanging eye hooks and wire
Here are the steps I took:
(1) Attach your stretcher strips by pushing them together at the corners. I used a block of wood and a hammer to help out. Measure corner to corner and then the opposite corner to corner. Wiggle them around until the measurements match. This means your frame is square. (Note: I think you are “supposed” to add a few staples across the stretcher joints to make sure they stay square. Mine were so tight fitting I omitted this step.)
(2) Lay the frame on your artwork in the approximate middle. The curved part of the frame is the front, the flat side is the back.
(3) Wrap the canvas around and staple an even amount of canvas at the centre of each side.
(4) Continue to wrap and staple the canvas around the frame evenly. Staple one side beside the previous staple, then staple the opposite side. Flip the canvas over after each staple as you go to make sure the artwork is straight. Remove and re-staple as needed. This proved to be a tad more difficult for me than I had expected, because the text needed to be straight I had to be super-careful not to overstretch the canvas or it made the letters wonky. Continue around the canvas until the staples are within 2 or 3 inches of the corners.
(5) Perfect corners! (a) Staple one of the canvas edges close to the corner. (b) Fold the canvas around the corner and on a 45 degree angle “inside” the other side’s canvas. (c) Staple the bottom layer of canvas along the edge to hold it in place. (d) Fold the rest of the canvas down, ensuring the corner matches the front corner of the frame and the edge matches the edge of the frame. The 45 degree angle can be wiggled around a bit to make everything match exactly. (e) This is a photo to show that the canvas folded inside the outer layer will show a bit.
(6) Attach two eye hooks and a length of wire approximately 1/3 of the way down the frame. This will make sure the frame hangs correctly on the wall.
All done – now go and hang up your new artwork!
I hope this tutorial has been helpful. I am most definitely going to use this to make some more for myself. Please let me know if you have any questions or comments!