by Sherri Sylvester | Nov 25, 2013

How was your weekend? We put our Christmas tree up on Friday afternoon and had a nice relaxing Saturday and Sunday. Then we woke up to find out that our youngest now has the flu. Too bad, I was hoping we hadn’t passed it along last week! Life goes on… and today I’m posting another Sally Dress while she plays on the tablet. I am so happy with this dress! Sometimes I sew something and it doesn’t turn out quite like I expected – this is not one of those times (hooray!) and I’m super pleased.
The fabric for this dress is one of the reasons I love it so much. The salmon pink/coral fabric is Dill Blossom by Robert Kaufman. I got it from Studio Fabric Shop at the Creativ Festival with this Sally Dress in mind. Since the interview with Devorah (owner of Studio Fabric Shop) was on Friday I thought I would finish and post the dress this Monday. And, just in case you haven’t signed up yet – you can win 10 fat quarters from Devorah’s shop. Just click over to the interview post and sign up using the Rafflecopter widget.
My second experience making the Sally dress was so much better than the first. I love my youngest’s green pintucked Sally, but it was tedious folding the pleats and it doesn’t slip over her head without some uncomfortable tugging. So, of course (again) without making a muslin first, I added a zipper to the back of my oldest’s version. It didn’t take a lot more work, but it turns out she doesn’t need it! Ah well. At least I was able to make this Sally fit the way it is supposed to. I see making quite a few more of this style with longer sleeves for the winter – since she insists on likes to wear dresses most days.
I added a Scirocco-style pleat to the centre front of the dress again. And some lace my mom sent to me that used to be my great-grandma’s. I don’t usually add lace to things – but the bodice seemed a bit plain without it. I was a bit worried it would make it look a lot like a nightgown, but dressing it up with tights and black shoes avoided that.
The sleeves on the original Sally dress pattern are elbow length – so I went searching for some woven sleeve examples. I’m always hesitant to add long sleeves to a dress made of woven fabric. My personal style has more to do with comfort most days than actual trendy-following style. So when I plan for my girls I want them to be comfy too. Woven sleeves generally seem tight and uncomfortable to me, but when I saw the A Happy Tunic tutorial over at Simple Simon and Co. I fell in love with the sleeves. They are perfect on the Sally dress. I extended the lines of the sleeve straight down to my daughter’s arm length and added 1″ to the straight side of the sleeve pattern for some extra room and so I could add some gentle gathers at the top of the sleeves.
Again, the large Sally pockets are really cute – they are made with the Lens Mills bow fabric I got at Creativ. I think they help to avoid the nightgown look as well. I used the same fabric on the bias tape to finish the sleeve ends and the bodice lining. I love that this dress turned out looking really appropriate for a little girl – but isn’t too little for her. My daughter loves the neckline since it matches her favorite square neckline knit shirts that she’s outgrowing. Maybe I could use this pattern to make her a few more.
I’m off to care for my littlest. Thankfully the medicine has kicked in and she’s up and about, albeit a tad wobbly. See you soon!
by Sherri Sylvester | Nov 22, 2013
Today I get to introduce you to the 6th Canadian Online Fabric Store to continue our series. I met Devorah from Studio Fabric Shop, based in Toronto, at Creativ Festival a few weeks ago. She opened her fabric store a few months ago, and comes from a very fabric related background! She balances the shop with working full-time as a clothing designer for her children’s line Red Thread (sold across Canada). If that doesn’t keep her busy enough, she also has three girls at home – ages 8, 10 and 14!
Devorah has generously provided an amazing giveaway (*Update: Giveaway is closed) for you and a discount for her store (she ships world-wide!). Find them at the end of this post. When I met her at the Festival I was impressed with the range of great fabric featured at her booth. I got some from her that I’m hoping to make into a dress for my daughter – cross your fingers I can post it for Monday! Checking out her website is a treat of colour for your eyes! I would say more, but she has provided an amazing description of her fabric style in her interview. If you are intrigued, she enjoys teaching sewing and quilting workshops – you can contact her through her website. I also found Red Thread’s article about children’s clothing shops and trends in Paris (apparently Liberty prints and plaid are popping up everywhere!) very interesting. Lucky her, she got to go shopping there this past summer!
Thread Riding Hood: What inspired you to start Studio Fabric Shop?
Devorah: “I’ve been working as a children’s clothing designer for the past nine years, creating a line called Red Thread. I spend a huge amount of time thinking about fabric – choosing it, designing with it, and making things with it. Many of the fabrics I use for my dresses are quilting fabrics, because I love the wide range of prints, the durability, and the feel of it. I also love designing and making quilts, and this has been a passion ever since I was a child. In university I studied the history of textiles and of craft (I have two very practical degrees in Art History and Japanese Studies) because I am endlessly curious and appreciative of beautiful fabric and the people who create with it.
Over the years many customers have asked me who designs my fabric, how I choose and combine it, and where they can find similar prints for their own projects. After nine years I have amassed a very nice collection, including prints that I have imported, many fabrics that are long out-of-print, and some unusual fabrics that are hard to find elsewhere. My constant requests for fabric collided with my desire to share it, so I decided to open a shop. Now I’m stocking the shop with new fabrics to supplement the collection, but everything is carefully chosen to reflect a particular aesthetic. The shop appeals to people who really like colour, Asian design, and fabulous prints, including larger scale prints than one usually finds in a quilt shop. There are many great basics as well, including some wonderful dots and stripes, but even those tend to be colourful.
When I opened the shop I was thinking of how difficult and expensive it can be to get great fabric in Canada, but I’ve been surprised to discover that although many Canadians have happily discovered the shop, orders have been coming from all over the world. I’m shipping fabric to Europe and Australia because in some cases, these prints (especially older designs) just can’t be found there.”
Thread Riding Hood: Where do you get the inspiration for your sewing?
Devorah: “For me the inspiration always comes from the fabric first. If I’m designing clothing with it, it’s all about how the fabric will make the wearer feel. Is it joyful, or beautiful? Will it make a child feel special or unique? When I’m making quilts it’s all about me and what my eye loves. I often will put fabrics together and come back to them a day, or even a week later, to see if I still love them. Unless of course I have fallen in love with something and need to make something with it right away. Some fabrics are simply irresistible!”
Thread Riding Hood: What is something coming up in the near future that you are especially excited about?
Devorah: “I’m excited about expanding my collection to include other lines that I love. Right now I’m working on bringing in Yuwa Japanese fabrics, and have Art Gallery Fabrics arriving soon. I’m also excited about offering downloadable patterns that I’m currently developing, as well as custom bundles of fabric. I love feedback, and hope that people will let me know what they’d like to see more of.”
(*Update: Giveaway is closed) You get a chance to win a stash-building collection of ten colourful fat quarters. They include fabrics by Kaffe Fassett, Anna Maria Horner, Heather Bailey and Liberty! Amazing and hooray – aren’t they pretty?! I’m imagining an amazing quilt from these! But of course there are so many more projects you could make. This giveaway is open to all Thread Riding Hood readers, internationally (No one gets left out, hooray!). The giveaway will be run from today, November 22nd, until Friday, December 6th, 2013 at midnight.
Enter by filling out as many sections as you wish in the Rafflecopter widget below. More points = more chances to win!
a Rafflecopter giveaway
Devorah is also providing Thread Riding Hood readers with a discount code – YAY! Shop at Studio Fabric Shop throughout the giveaway (November 22-December 6, 2013) and get 10% off your order with the code: “taketen”! Here are some of my favorites from her store… happy shopping!
I hope you enjoyed finding out about another Canadian Shop. I found reading about Devorah’s background and attention to detail in her fabric choices inspiring! Be sure to check out her shop to use your discount! As always – you can find more Canadian stores on the Pinterest board. Have a great weekend, see you on Monday!
Note: I have not received compensation for this post and as always, all opinions are my own. I would not recommend Devorah’s shop if I did not think you would like it!
by Sherri Sylvester | Nov 21, 2013
Today we’re heading back into the folder of things I have photographed that I keep around for emergencies. It’s not a true emergency, but maybe a hiccup in bloggy terms. I have really not touched my sewing machine since last Friday so I don’t have anything new to post. I know – it’s crazy! I think I over-estimated my ability to do everything last week and then NOT crash this week! Anyhow, my daughter has also gotten the flu and so I have a little bit of an excuse.
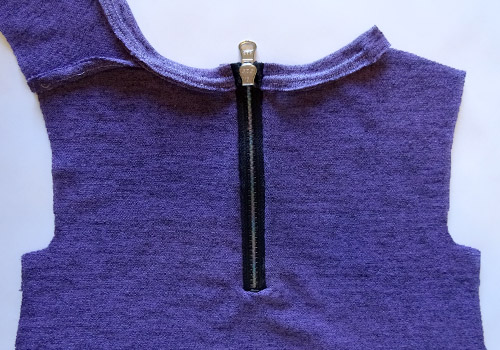
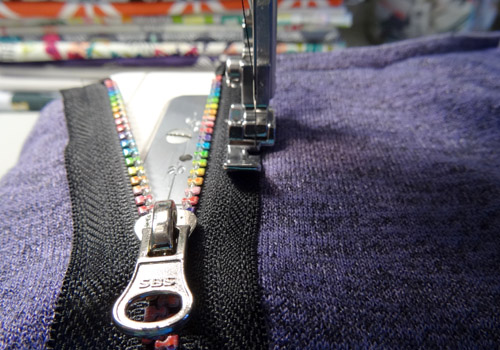
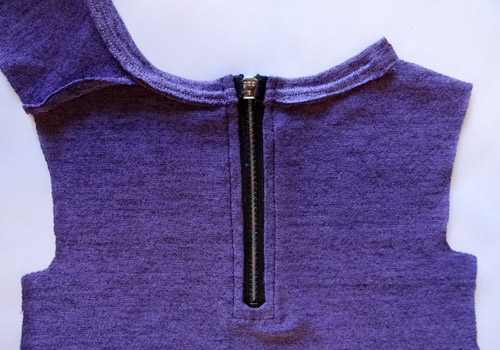
A while ago I posted my oldest’s Banyan Tee with an exposed back zipper. I have had these tutorial photos available since the post and was just reminded I should actually write the tutorial! I love this look. It’s fun, and adds a bit of designey-oomf to the back of a shirt.
You’ll need a zipper in the length you would like and a glue stick. Preferably an Elmer’s Extreme glue stick as I’ve found it works the best. The length of the zipper varies depending on the size of the shirt wearer. I used one about 8″ long with super-cool kid friendly rainbow coloured teeth. Since I made this shirt from scratch these instructions are on an un-constructed shirt. You could do this with a ready-made shirt, but the process is a bit more difficult because the shirt can not open out to be flat.
Here we go:
(1) Stitch together 1 shoulder and add the ribbing to finish the neckline.
(2) Mark a line on the centre-back – you can easily lightly iron a crease into it and then mark over the crease. (It might not look centred because you have not stitched the seam allowance on the second shoulder yet.)
(3) Place the zipper so the to of the slider matches up with the top of the collar. Mark the top of the bottom zipper stop on your centre line.
(4) Cut down the back centre line until you reach your mark.
(5) Glue down the zipper tape that extends past the top zipper stop. Fold them over to the wrong side of your zipper tape and stick them down matching the sides of the tape. Make sure the tape stays clear of the zipper teeth.
(6) Turn the shirt over to the wrong side. Match the edge of the right zipper tape with the left edge of the opening you cut and glue it with the folded edge matching to top of the collar. Keep the glue within the 3/8″ seam allowance.
(7) Stitch the zipper with a 3/8″ seam from the top of the collar to the bottom of the zipper stopper along the right edge.
(8) Maneuver the zipper so the right side is laying against the right side of the shirt and the left side is attached to the wrong side of the left side of the shirt – matching the shirt and zipper edges.
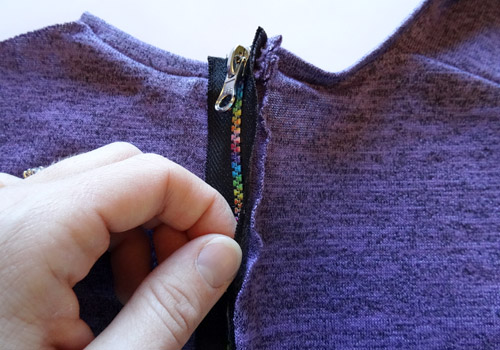
(9) Stitch the left side of the zipper from the top of the collar to the bottom of the zipper stopper. Turn the zipper to the outside using the opening at the bottom of the zipper.
(10) Peel apart the glued seam allowance and zipper tape.
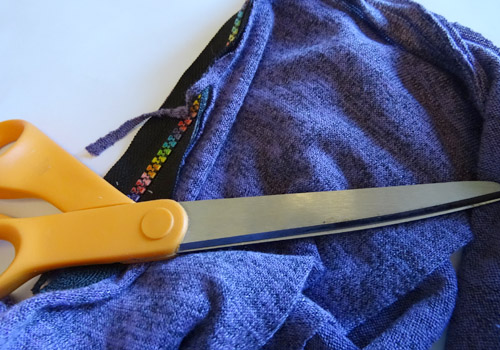
(11) Trim the seam allowance close to the seam.
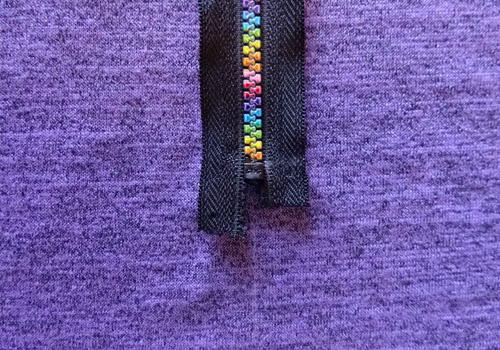
(12) Glue both of the bottom edges of the zipper tape under in the same way you glued the top edges. Leave a little under the zipper stop.
(13) Top-stitch the edges of the zipper and across the bottom under the stopper.
(14) Here is a better shot of the stitching from the back.
All done! Take some fun photos and post them with the hashtag #alongforthreadride! I’d love to hear your thoughts on the tutorial. Could it be clearer? Would you do things differently? Thanks for the feedback!
by Sherri Sylvester | Nov 19, 2013
We had my oldest’s 6th birthday party over the weekend – the best/simplest party yet I think. She is growing up much too fast. I love that she wore her princess dress to open gifts in the morning, read all her own cards and properly thanked her sister for the hand-sewn “stuffie” she had made herself! We are so proud of her!
She decided we should have a Movie Star party… and as it turns out it is a really great simple party to host and the kids loved it! We got them all movie star sunglasses, decorated popcorn buckets with names and jewels and set out movie snacks – candy and popcorn of course, with flavoured popcorn shakers.
They got their take-away gift (can’t really call it a goodie bag) before the movie. I made them each a Star Stuffie – going with the movie theme here! – and each star had it’s own personality, introduction poem and adoption certificate. They each chose a numbered star from a bucket and then went to choose a gift bag in that order. We read the poem and named their star on the spot. Then they took their buckets and stuffies to watch the movie – and I got to clean up a bit, prepare for the cake and sit and hang out with a friend – hooray! Seriously – when do you sit at a kid’s birthday party?
I would also like to say a huge thank-you to Shannon from googiemomma, the whole idea is a great post I found when looking up the S.tuffed A.nimal C.hair tutorial. She has did this with owls – which are super-cute, but don’t match the “Movie Star” theme, so I got creative and made stars instead. Shannon got the idea from Anj, who writes Snowy Bliss and has the most ridiculous amount of patience and planning ability for her decorations and owls – seriously – you have to see them! And, since you are there – check out her Magic Party where she uses the same idea with bunnies – so cute!
I thought it would be fun to share the pattern pieces and a few notes on how each star was made. One would even be cute as a birthday gift by itself! As far as materials – each is different, except for the star shape. The best thing to do is to download the pattern pdf and then sort out the fabric yardage from there. I bought 1.5 metres of yellow fleece and still have about half of it left over. The clothing can be made with fabric scraps and the eyes and mouths cut from felt. I hand-stitched them on because it was the easiest option and it only took 2 hours to finish all of the faces. I’m not including the face templates because my husband cut and painted them for me so I don’t have anything to make the pattern from. I’m so grateful that he took the time to do it, and I think he had fun cutting out different “looks” for all of them based on their character.
Here we go! The downloadable pdf pattern pieces and the poem and adoption cards can be downloaded at the bottom of the post. I’m including sewing/other notes for each star in the pattern pdf as well.
Baker Star Stuffie
Ballerina Star Stuffie
Cowgirl Star Stuffie
Fairy Star Stuffie
Mermaid Star Stuffie
This one is my favorite. I love the ruffle fabric scales, the fins and the star eyes. The trim I kept for “something in the future” works perfectly for a necklace. I have to give all of the credit to my husband for coming up with this one. I can see a whole ocean of them in different colours for giveaway gifts at a Mermaid Party.
Pirate Star Stuffie
Princess Star Stuffie
Group Shot!
It was so hard to get these guys to stay still for the photos – this shot turned out a bit wonky!
Click here to download all of the Pattern Pieces and Instructions.
Update: * Please print the pattern pieces at their original, or actual size. Make sure you do not choose the “Fit to Page” option. *
Click this link to download all of the Poem Cards.
Click this link to download the Adoption Certificate Cards.
Hope you had fun checking these out! Which one is your favorite? I’m super-happy that these went well, but also that they are done and I only had to make seven of them! I have to admit that the star shape was a challenge to work with and the stars – though cute – do have a “body builder” feel to them. The wide shape of the star lends to some broad shoulders! The kids really liked them though. So they get a kid-friendly “Gold Star” of approval. Speaking of which, a “Gold Star” would be cute, as would a “Super Hero Star” complete with cape. Next time then?!
I’m off to clean my office so I can post my sewing space next week. See you again soon!
by Sherri Sylvester | Nov 15, 2013
This week has been crazy! My oldest daughter’s birthday party is tomorrow, and even though I have scaled way back this year it still seems to be taking up the week. So, I’m posting few exciting things that have been happening (and a surprise for next week!) so I can go back to cleaning my house for tomorrow. (Lucky me?!) Thank goodness we only have two kids that have birthdays only once a year! I think I’ll be okay.
#1: I finally figured out Instagram! HOORAY! (and I love it.) I’ve added it to the sidebar so you can check it out here. Or you can follow along and see a few things from the last week… My youngest’s latest sewing project, Niagara Falls from my weekend trip… and you have to check out the crazy chairs from our hotel! There will be peeks of projects as I’m working and updates when there is a new post. The Instagrams are generally linked over to Twitter, so if you’re connected there you’ve already seen them – lucky you!
#2: Cynthia Frenette’s “I Can See Clearly Now” Pouch pattern is now for sale! She’s had it up on Etsy since Monday, but if you are not following Thread Riding Hood on Facebook you might have missed the announcement. You can get the pattern on Etsy, check out her post about it on her blog and check out my review of it too.
#3: Surprises! I’m super excited to be able to host another Canadian Online Fabric Shop post next week. And she’s got some surprises for you too – hooray!
And – because a post without pictures is no fun at all! Here’s a sneak peek of what I’m working on – can you figure it out? I’ll be posting a pattern and tutorial for it on Monday and you might catch some more pics on Instagram over the weekend if you are super curious! Hope you are having a great day today.