by Sherri Sylvester | Nov 13, 2013

Here she is folks. Thread Riding Hood’s Granny. She’s a kind, warm, squidgy Grandma that smells like Molasses Ginger Cookies most days and always has fabric threads on her sweater. But she’s not frumpy – this Granny is cool and trendy too! So far she’s only needed her head, so that’s all she’s got for now. I thought you would like to meet her and she wanted to say “Hi” anyhow so I couldn’t keep her away much longer.
Granny has kindly offered to give me some help in my next venture – selling some pdf patterns! She’s going to provide “Notes and Tips from Granny’s Sewing Basket” along-side the pattern instructions – so you can more quickly and simply make your projects! The first few downloadable patterns are going to be made from tutorials that are (and will continue to be) offered for free.
So… why should you buy them if the tutorial is still free? Thanks for asking! Here are a few great reasons:
PDF Sample Page
- Granny’s Sewing Basket Notes and Tips – Granny makes your life easier and your projects better!
- The pattern looks amazing (if I do say so myself), and is easy to read and follow.
- Tidy, Organized instruction sheets – Much better than what comes out of your printer from the free tutorial.
- Tutorial instructions & Pattern pieces, all in one place. One download – done!
- Check boxes on each step and in the Material’s List, for those of you who love checking things off as you go!
- Large “Seam Allowance” icons that are easy to spot. No more searching around for them!
Aside from these great features, you can choose to purchase the PDF to support this blog and help Thread Riding Hood continue in its goal to create more free content! (And a big THANK YOU from me if you choose to do this!)
The (ever popular) Super Hero Cape PDF Pattern has been up for sale since last Friday as an instant download for “any donation”. So far, the response has been great – the DIY community is amazing and I’m heartened by the fact that you would choose to download something that is clearly still available for free. (Though the pdf is much nicer – just have to throw that in there!) I also like that it helps to prove me right – as some of my more “business-minded” friends thought it wouldn’t sell! I love that handmade bloggers and readers, sellers and buyers have created an atmosphere of support for each other and the person’s they interact with.
If you want to buy the Super Hero Cape PDF you can click over to the original post to get it. Or you can do it right here!
SUPER HERO CAPE PRINTABLE PDF PATTERN: available for any donation!
Next up? I am going to concentrate on offering downloadable pdf’s for The Sunny Glasses Case and The Handy Fridge Towel. After that (and it’s later than I’d like if you are waiting…) is The Butterfly Backpack – which is going to be offered as a real-and-for-true downloadable pdf pattern for sale. It’s photographed, but I need to write up the instructions and design it, which is proving to take longer than I was expecting, as usual!
I hope you are having a great week. Thanks again to everyone for reading and supporting Thread Riding Hood. I love blogging (and sewing!) and feel very fortunate to be able to dedicate so much time to something I really enjoy doing.
by Sherri Sylvester | Nov 12, 2013
My computer decided not to work last night – so you get Monday’s post on Tuesday today! Thank goodness it’s working now… (sign of relief!)
So. You have a ton of stuffed animals… and they are all over your house… what do you do? Put them in an S.A.C. – the S.tuffed A.nimal C.hair, it’s a genius idea that Shannon from googiemomma made and has a tutorial for. Hooray! In case you’ve seen this before, it is from 2011. Problem is I saw it BP (Before Pinterest) and bookmarked it – and forgot about it until my friend pinned it a while ago and reminded me how amazing it is. And… I had the perfect fabric (that I won, eek!) waiting on the shelf! I entered a Violette Field Threads contest this past May where Whimisical Fabric was giving away 8 yards of Riley Blake chevrons and dots in delicious colours… and all of a sudden it was mine. That never happens!
My youngest has a thing for green!
When I won the fabric I told Danielle from Whimsical Fabric that I would post whatever I came up with on Thread Riding Hood, and she offered to give me a discount code to share with all of you. And, as a bonus for you – since Shannon’s S.A.C. pattern does not come with a pattern piece, I volunteered to make one. And, I made it in two sizes because the first one I made is amazingly too big! (Imagine something so large it won’t hold all of your children’s stuffed animals.) I had to stuff one of our extra pillows and the unused (but still loved) nursing pillow in the top to fill it up for the photos!
Whimsical Fabric is just what the name says. I love the playful variety of fabrics that Danielle stocks. And she also has patterns, notions, packaging and clothing blanks – lots to use the discount on! Head over to Whimsical Fabric and use the discount code: TRH10% to get 10% off almost everything in the Whimsical Fabric shop from today until Wednesday, Nov 27th, 2013 at 12 midnight MT! You can even use it for most sale items. (Items that do not apply for the discount will state this in the description.)
I don’t think (if you have children) that I have to try to convince you to make one of these! My kids fully endorse ours and it’s super comfortable to sit on… I’ve tried it! Just don’t put anything too hard inside and you’ll be fine. We even have a mewing cat in there that sometimes goes off if you sit on it right and the kids think that’s hilarious. You can read Shannon’s very funny post about it for more information also, since that is where you will get the bulk of your instructions. On with the pattern pieces?
The large size pattern will get you a (roughly) 85″ around, 18″ high and 25″ across chair. The smaller size pattern will be aprox. 70″ around, 12″ high and 20″ across. Both of my kids like curling up on the large one, in fact they can both fit on it at once. And the smaller one is the perfect size for my youngest who is 3 1/2. As she states – “This fits my bum and legs perfectly.” How do they come up with this stuff?!
You will need:
- Fabric – Assuming it is 42″ wide prewashed, see “Cutting Your Fabric” below for cutting layouts & more information. You will need more for nap and one-way fabrics.
- Large size in 6 fabrics: 2/3 Mtr/Yds each of 5 Outer Top fabrics, 3/4 Mtr/Yd Outer Bottom and 2 3/4 Mtr/Yds Lining
- Large size in 1 fabric: 2 3/4 Mtr/Yds each of Outer and Lining
- Small size in 6 fabrics: 1/2 Mtr/Yds each of 5 Outer Top fabrics, 1/3 Mtr/Yd Outer Bottom and 1 2/3 Mtr/Yd Lining
- Small size in 1 fabric: 1 2/3 Mtr/Yd each of Outer and Lining
- Same yardage as lining in high loft batting if using (less enough for the bottom zipper pieces which do not need batting, more info about the batting below)
- Zipper: 25″ for large size, 20″ for small size
- Pattern Pieces:
Notes on my changes:
- I only made two changes to Shannon’s tutorial. The first was to add a pentagon shaped patch over where the points of the side pieces match up at the top. This is because I was in a hurry and didn’t take the time to line them up. The second was to adhere batting to the lining as I sewed it together. So the entire chair (except the zippered bottom) is lined with quilt batting. I found that the high loft cheapy polyester batting smooths out any bumpy edges and makes the chair smoother. Especially since I used quilting cotton. Shannon leaves a gap at the top of the lining for some stuffing – either way is great. I have included directions on how to do the optional changes below.
Before you begin:
- Print all pages of the pattern piece pdf in the size you choose on letter size (8.5″ x 11″) or A4 paper. Important: Make sure scaling is set to “None” or “Actual Size” when printing. Once you have printed the pages, measure the 1″ test square to ensure the pattern is the correct size.
- Cut or fold the pages on the outer gray lines and tape/glue the pages together, matching the letters in the gray half-circles.
Cutting your fabric:
- Cut your fabric as per the pattern piece directions and notes on the S.A.C. Tutorial Post on googiemomma.
- Visual layouts for each of the 4 options are below so you can see more easily how much fabric each option uses. Pieces are illustrated in full – not “cut on fold” shape.
- Please use the diagrams as a guide only, referring to the S.A.C. Tutorial for placement.
- You may need more/less yardage for one-way and directional fabrics.
Large Size OUTER Fabric Yardage for 6 Fabrics (see Large Size in One Fabric for Lining Yardage)
Large Size in One Fabric Yardage (You will need this much each for Outer & Lining)
Small Size OUTER Fabric Yardage for 6 Fabrics (see Small Size in One Fabric for Lining Yardage)
Small Size in One Fabric Yardage (You will need this much each for Outer & Lining)
Sewing Instructions:
- Follow the googiemomma directions on the S.A.C. tutorial post to make your Stuffed Animal Chair.
- A 1/2″ seam allowance is included in the printable pattern pieces.
- A 3/8″ seam allowance is included for the zipper seam.
Optional Instruction: Add the Pentagon Patch – Do this after stitching together all of the outer outside pieces. (1) Cut 2 the tiny pentagons out of your fabric (see pattern pages). (2) Stitch them together right sides together. Leave an opening on one side for turning. (3) Turn the pentagon, folding under the opening edges and ironing the sides. (4) Line the straight edges of the patch up with each side of the outer outside pieces and pin generously. (5) Topstitch the patch. (6) Turn the outer pieces over and CAREFULLY! cut out the centre of the fabric that is under the patch.
Optional Instruction: Add Quilt Batting to the Lining – Do this when stitching the lining pieces together. (1) Cut 5 pieces of batting using the outside pattern piece. I used my cut fabric as a template. (2) Place tape over the open edges of your zig-zag foot. This prevents the batting from getting stuck in the points. (3) When stitching the lining together, place 1 batting piece on either side of the lining before stitching, and while it is right sides together. Like this: Batting, Lining pieces Right Sides Together, Batting. (4) Stitch together following the instructions, making sure to stitch each outer outside lining piece with a batting piece.
Here’s wishing you many happy stuffie-free days ahead – and a comfy spot for your kids to sit too! Please share your projects on Facebook, Twitter or Instagram – hashtag: #alongforthreadride so we can see them. I love to share my favorites too!
by Sherri Sylvester | Nov 8, 2013
When Warp & Weft introduced their Sewing Society I was excited to find three new Canadian bloggers that I hadn’t heard of yet! One of them was Cynthia Frenette, whom I’ve been following ever since. She writes cynthia f – a highly addictive blog – trust me I know! Aside from that she is a quilter, illustrator, designer and artist in general. If that is not enough, she keeps Made In Magazine going and has designed fabric for Robert Kaufman. And I’m sure there is more I don’t know!
As I was saying, her blog is addictive, and one day I stumbled on the post of her latest project – a pouch pattern – that asked for pattern testers. I’m super happy to have volunteered and gotten to make it! Aside from raving about how great this pouch is (truly!), I can honestly say it has great directions. I was excited to read through the well-thought out instructions and find they were very easy to follow.
The clear window gives this pouch the great feature of having two “fronts”! You can choose an amazing fabric for the back quilted panel and the lining – because it shows through the window. Score! I was excited to use my Fabric Spot Tsuru bundle for both pouches. Which is a good thing, because I only had one snap hook to use for the handle, and now I can swap it based on whichever I’m using at the time!
I love the size, it is even large enough to fit a regular sheet of paper – so you are able to carry printed pattern sheets and your sewing supplies at the same time! I really would like to make a few more of these to fill with “kid stuff”. It would help keep them occupied when we visit my family via plane in December. And it is easy for them to see what is inside – key to not digging through your bag too much in an enclosed space!
The pattern is almost available and I will most definitely tell you when it is so you can make 17 of these for yourself (or as a great Christmas gift!). Hope you have a happy Friday and a great weekend. See you on Monday!
by Sherri Sylvester | Nov 6, 2013
Have you seen what’s happening over on Sew Mama Sew this month? It’s the Handmade Holidays y’all!
Every year since 2007 Sew Mama Sew has put together tutorial roundups for everyone you can imagine needing a gift for. One theme every day! I got hooked on these a few years ago and they are an amazing source of information. This year they are having guest curators who have spent many hours searching the internet for gift tutorials based on a category they have suggested. The lists are an amazing resource that can be used all year long – especially when you need something unique for that hard-to-buy-for person and you need an idea (or 20!).
Today’s “Gifts for Geeks” led me to this amazing LEGO-endorsed Star Wars quilt – and the patterns for the paper piecing are amazingly available for free! My husband would LOVE this quilt!
Just in case you want to get stuck online doing something other than searching Pinterest today, here are the links to the past 6 Handmade Holiday Master Lists – and you can go directly to Sew Mama Sew for the first 6 posts of this month! (and then of course go there every day until the end of November for more!)
Handmade Holidays 2007 · Handmade Holidays 2008 · Handmade Holidays 2009
Handmade Holidays 2010 · Handmade Holidays 2011 · Handmade Holidays 2012
Since I don’t want to get sucked into making too many of these for Christmas, I have made myself a giant list for this month already! Instead I will be pinning my favorite amazing projects to start in December? or maybe April…. – whenever my work runs out!
by Sherri Sylvester | Nov 5, 2013
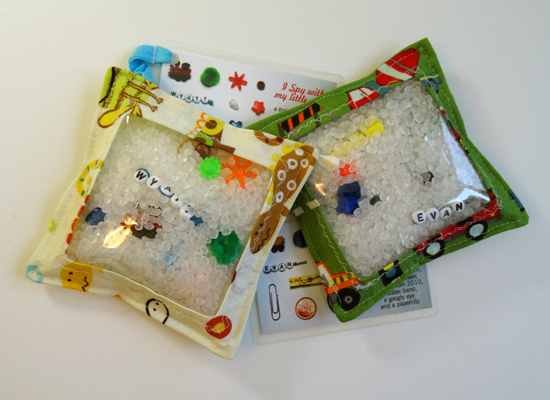
Today I’m bringing back an oldie-but-goodie! The I Spy Bag has been around for quite a while but the most recent tutorials that pop up on my Google search are from 2011. It seems the trend to make these has died down. When I went searching for a tutorial for this myself it was used to make gifts for the kids at my youngest’s first birthday party over 2 years ago! I went searching high and low through my bookmarks trying to find the same tutorial I used then and I can’t find it anywhere. So… I have made a new tutorial for you based on what I can remember with the usual “few changes” of course! (If you happen to find an I Spy tutorial made this way can you tell me? I’d like to give proper credit where it is due. Thanks.)
It’s amazing how quickly these go together. Once you have the supplies it only requires a few seams and you are good to keep your kids busy for a while! They make great party favours, easy gifts or stocking stuffers and are great to give with a new baby gift so any siblings don’t feel left out. Despite their ease, I have a confession to make. This is one of those projects that has been on the back burner for far too long. If I have calculated it right I promised to make these 2 years ago… oof… how did that happen? I’m pretty embarrassed about it, and feel guilty that I know the friend I’m making them for will be super gracious about it. I am really relieved to have finally finished these. I suppose telling you this is a somewhat cathartic exercise for me – though I’m not sure I feel entirely “better” having confessed! It is just good to have finished.
I am always surprised at the number of projects I start that I have not finished even a year later (never-mind two!). I have a friend who will only work on one thing at a time and won’t move on until she is finished. How I envy her discipline! I’m curious how you handle your projects – do you finish everything you start? Or begin and end when the mood strikes?
Either way – here is the tutorial so you can finish a bunch, or leave them on your shelf for a year! (and “either way” – be sure to pin it so you don’t forget!)
You will need:
- 2 pieces of 5 1/2″ square fabric
- 1 piece of 5 1/2″ square clear vinyl – I used 8 gauge vinyl
- 5″ length of ribbon or twill tape
- mini objects for spying (beads, pom poms, buttons)
- cardstock printed or laminated card with items
- fabric glue for extra durability – I used Liquid Stitch
- plastic pellets – I got mine from Michael’s with a 40% off coupon
Here we go:
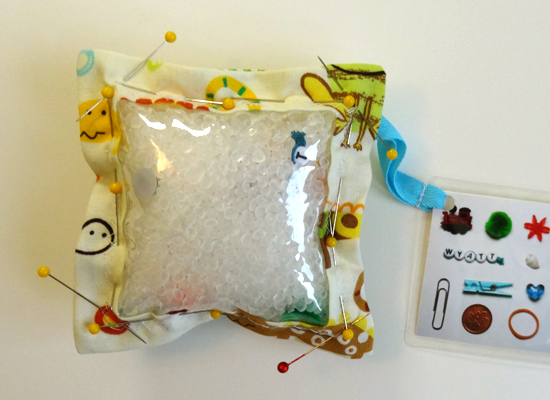
(1) Make the cards with the listed items. I used a business card size and found a self-laminating kit at our local Dollar Store. Punch a hole in one corner. Feed the ribbon/twill tape through the hole and fold it in half. Stitch through the tape close to the card to hold it in place.
(2) Draw a 3″ square in the middle of the wrong side of one piece of fabric. Cut through the small square from corner to corner diagonally (see photo).
(3) Fold each triangle back along your drawn line to make the I spy window. Centre and glue the vinyl on the wrong side of the fabric. Glue ONLY around the window area.
(4) When the glue is dry, trim the excess fabric “triangles” to approximately 1/2″ (see photo). Stitch twice around the window area. I used a decorative stitch. If the presser foot sticks to the vinyl try using this trick. Do not trim the vinyl, it adds extra strength to the toy.
(5) Glue the window (with vinyl backing) and outer back fabric, right sides together around the edge. Leave a 2″ opening in the top left hand corner for turning. ** Make sure the glue is only within 1/2″ of the outer edge so it is in the seam allowance when you sew it. When the glue is dry, stitch around the edge with a 1/2″ seam allowance, making sure not to stitch over your opening. Clip corners and trim all edges to 1/4″ except at opening (see photo). Finish your edges by cutting with pinking shears or use a zig zag stitch on all edges except the opening.
(6) Turn the bag inside out. Fold the opening edges to the inside. Iron the edges, be careful not to melt the vinyl.
(7) Fill with the plastic pellets. I used 1/2 cup. Fill with a funnel and be sure to insert your mini objects. (I usually double-check that I have the correct objects as I put them in, just in case!) Insert the ribbon 1″ into the opening and glue the opening shut.
(8) When the glue is dry, unpin the opening and re-pin around the edge of the bag, forcing the pellets into the centre. Top-stitch around the edge of the bag, this will also close the opening. Double-stitch over the ribbon to make it extra secure. All done!
I’d love to see your I Spy Bag! Post your project on Facebook and it might end up in a “You Made It” post here on the blog. I’d love to hear if you liked this tutorial or any changes you might make. Thanks!