by Sherri Sylvester | Sep 5, 2013

Today I get to tell you how to remix your Scirocco pattern! I know you have seen the super-twirly Empire Waist Sundress I’ve made using the Scirocco pattern from Figgy’s. I’ve also made her Banyan tee, it turns out really cute. And of course the Scirocco-based bathing suit too! Figgy’s directions are very easy to follow and I love her clothing designs. There are some new Fall patterns coming out soon. Follow Figgy’s on Facebook so you know when they arrive! (You’ve also got to check out the Sunki. I love the pockets, it’s next on my list!)
I’m also super excited to be able to give you a discount code to buy this or any other of Figgy’s patterns! Figgy’s owner, Shelly, has kindly offered a discount for Thread Riding Hood readers – 10% off all Figgy’s Patterns! Use the discount code: “FIGGYSTRH”. The code expires September 11, 2013, so you’ve got a week to buy them!
You can read more about this dress in my July post here. I LOVE how twirly it is, and of course, so does my daughter! The twist in the back is one of my favorite things to sew this summer. Hooray for Figgy’s!
Want to get started making your own Empire Waist Scirocco Sundress?
You will need:
- fabric – green tiered ruffles – aprox. 1/2 metre for size 4/5
- fabric – pink tiered ruffles + bodice, lining – aprox. 1 metre for size 4/5
- Figgy’s Scirocco pattern
- 1/4″ wide elastic
- ruler, pencil, paper scissors (for altering pattern)
Before you begin:
- Print, glue/tape and cut out your Scirocco pattern pieces as per the directions. You will only need to print pages 13-18, because we will be using only the Dress Front and Dress Back pattern pieces for this tutorial
- Note: I made this dress in a size 4/5 – you may need to adjust some measurements if you are making the dress significantly larger or smaller. I have noted how to change the measurements throughout the tutorial.
Altering & Drafting the Pattern Pieces:
Bodice Height: (1) Get one of your daughter’s empire waist dresses. Measure from the shoulder to the bottom of the empire waist. My measurement was 8″. (If you don’t have one handy, borrow a measurement from an empire waist dress in the correct size the next time you are at the mall!) (2) Mark a 1/2″ seam allowance on the shoulder seams of both pattern pieces. (3) Using the Dress Front, measure down from your shoulder seam allowance mark to your empire bodice measurement length + a 1/2″ seam allowance. I measured 8.5″. (4) Use this measurement to mark a line across the Dress Front that is parallel to the bottom of the pattern piece. (5) Mark the Dress Back in the same way. Cut along the new length lines of both pieces – you now have your empire length Dress Front.
Dress Back Modification: (6) Measure 2″ in from the side of the Dress Back and mark. (7) Use a ruler to draw a line from the bottom of the centre back (see photo) to your 2″ mark. Gently curve the line and cut to finish your new empire length Dress Back pattern piece.
Tiered Ruffles Height: Measure the length of your sample dress from the bottom of the empire waist to the hem (or other desired length). This dress has 4 tiers, so divide your length measurement by 4 to get “X”. Each tier height = “X” + 1″ (The 1″ is for a 1/2″ seam allowance on each edge). My ruffles were 5″ high each. IMPORTANT: Add 1″ extra to the bottom tier so your ruffles are all the same height after hemming.
Tiered Ruffles Length: The top tier should be double the chest measurement of your child. I rounded down from a 22″ chest measurement to 20″ and doubled it to get a 40″ length top tier. From there I added 20″ to each tier, as follows. Tier 1: 40″ length, Tier 2: 60″ length, Tier 3: 80″ length, Tier 4 (bottom): 100″ length. Tier 1 is almost half of the Tier 4 length. Depending on your Tier 1 measurement, you can add/remove length as necessary to achieve the same proportions. Note: You can also use the Dress Front pattern piece as a guide – measure across the bottom of the Dress Front, double to get the “chest measurement” and then double it to get your Tier 1 length. (If you use the Dress Front measurement your finished Sundress will be fuller than mine, because of the ease already factored into the pattern piece.)
Back Elastic Casing: You will need a small piece of fabric to use as a casing for the back elastic. It should be 2.5″ tall (to fit 3 casings for 1/4″ elastic) and the length of your chest measurement. (We will be cutting the length a bit shorter later on in the tutorial, mine ended up being 17″ wide.)
Cutting your Fabric:
(8) Cut out your altered Dress Front and Back pieces as per the Scirocco instructions (don’t forget the lining!). My fabric looked the same on both sides, so I found it helpful to put a safety pin the right side of each piece as I cut it out, as per this trick. (9) Cut 1 each of the 4 ruffled tiers based on your drafted sizes above – Tier Height by Tier Length. You will likely need to stitch several pieces together to get the desired length. Don’t forget to add an extra inch to the height of the 4th (bottom) tier to allow for hemming. Also cut out the Back Elastic Casing piece (drafted above), you will need 1 of these.
Here we go:
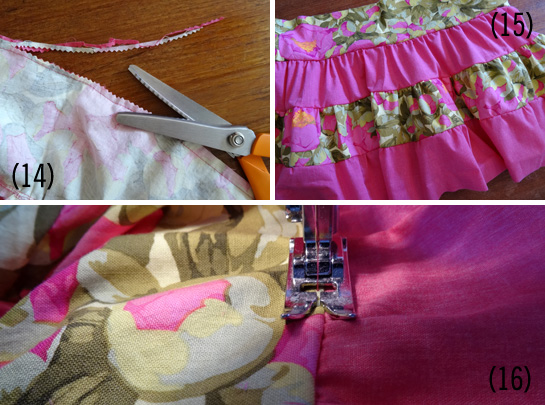
(10) Follow the Scirocco directions (Figgy’s steps 1 through 18) to make the bodice for the dress. (11) Match up the short ends of your tier pieces, one at a time (right sides together) – pin, stitch at 1/2″. Serge, zigzag or trim with pinking shears to finish the edges. (12) Gather the top edge of the three bottom tiers to the width of the tier above. (Size of the top edge of Tier 4 should equal the full width of the Tier 3 piece etc.) DO NOT gather the edge of the top tier yet. (13) Match the top edge of each tier with the bottom edge of the tier above it. Pin, stitch at 1/2″.
(14) Finish the raw edges. (15) You should now have the entire skirt sewn portion together. (16) Top-stitch each tier. Stitch close to the bottom edge of each tier, making sure your seam allowances are pressed up so they are “caught” in the top-stitching. (17) Hem the bottom ruffle. Iron the raw edge up 1/2″, then 1/2″ again. Press well and stitch close to the top folded edge.
(18) Mark the “sides” of your skirt with pins along the top edge. Measure between the pins and subtract 4″. Cut your Back Elastic Casing to this length. (19) Hem both short raw edges of your Back Elastic Casing by folding and pressing under 1/4″, then 1/4″ again and stitching. (20) Iron up 1/4″ on one bottom edge of your Back Elastic Casing (this guide is really helpful). Press well.
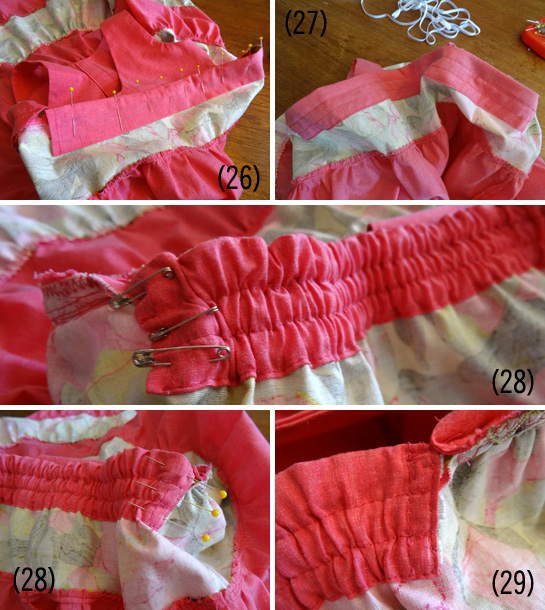
(21) Centre the raw (unfolded edge) of the Back Elastic Casing right sides together on the back top edge of the dress skirt. Stitch with a 1/2″ seam. (22) Gather the skirt top along the raw edge to match the bodice bottom edge. Do not ruffle the Back Elastic Casing. (23) Pin the bodice to the skirt, right sides together along the front of the bodice. (24) Match up the back dress bottom edges with each edge of the elastic casing. (Note: Gather the skirt top more or less to match the length to fit.) (25) Stitch with a 1/2″ seam allowance, finish your edges.
(26) Iron the Back Elastic Casing down, enclosing the seam allowance. (27) Stitch across the bottom edge of the Back Elastic Casing, and twice more to create 3 evenly spaced casing tunnels (see photo). (28) Insert elastic through the casings, each piece should be roughly 1/3 the length of your child’s chest measurement (This will likely give you more than you need). Pin the end of each elastic piece on one end, and safety pin it at the other end. (29) Stitch over the pinned elastic in a rectangular shape to catch each elastic twice. This is visible on the outside of the dress – so be tidy! (30) Try the dress on and adjust the elastic as needed. (My elastic casing ended up being 6″ long once inserted in the casing.) Stitch as per Step 29. Done!
Hooray! Put it on a twirly someone and take a picture! I’d love to see your creation. If you would take a second to post a photo on the Thread Riding Hood Facebook page that would be amazing! You might even get shared (if you’d like) on a Made by You blog post!
by Sherri Sylvester | Sep 3, 2013
I supposed that it would happen eventually, but I was NOT ready for my oldest to be in school “all day” yet! But it happened, and now our lunch table holds one less set of cutlery – which I found myself tearfully removing today. We are so used to all being home, all day, every day (we own our own business, so my husband works from home as well), it was a strange thing for one of us to be missing!
My youngest and I will have to sort out our own schedule over the coming weeks – she’s never been away from her sister for as long as she was today, not even once before in her three year old life. Thankfully she’s a good helper and loves to be cleaning, or cooking, or sitting on my lap when I’m working! I’m looking forward to spending some time with her, just like I was able to do with her sister when she wasn’t around.
I finally finished my “back to school sewing” last night. The list was not so long – just a pencil case this year! I took the “less time” route and bought her a new dress to wear for the first day. The pencil case is a “copy” of one my friend Laura posted on her Facebook shop page – I love the peekaboo plastic insert – so you can see what’s inside. I also got to make another zipper pull, this time with a covered button! I say this case is a “copy” because I just had the picture and should likely have just gotten Laura to explain how she did it. I wanted to fully line the inside and was having a hard time getting my head around the construction – might have something to do with a lot of late night sewing… This is actually my second try, the first has been relegated to an “at home” pencil case – never to be seen by anyone who knows I can sew! Do you have projects like that?!
Likely much to my teacher friend’s dismay (don’t laugh Leanne!) I followed the bus to her school, 5 minutes down the road! It was comforting to see her getting off the bus – though she tells me later she got a bit lost on the way to her class. I want so much to protect her from everything that might be scary or make her nervous. It is strange to have to let go of your kids, let them sort through life and figure out how to deal with it – just like you did when you were their age. Thankfully she is excited to go back and kept asking us “what we wanted to know about her new school” during dinner.
Apples for her new teacher in hand, second year running….
Here we go – ready or not – back on schedule again until next June! How was your kids’ first day of school this year?
by Sherri Sylvester | Sep 3, 2013
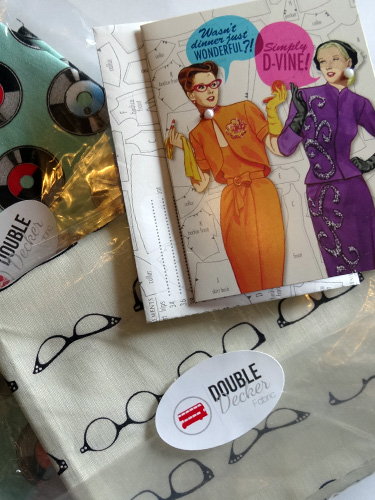
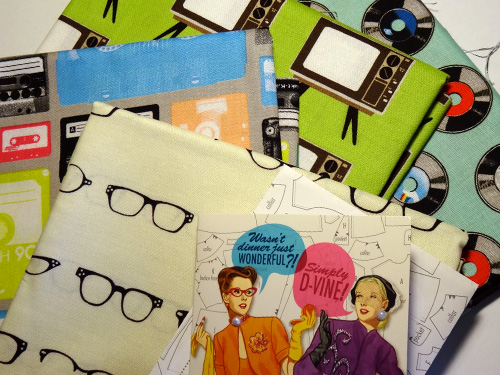
I was super excited to get some of the Geekly Chic line in the mail today from Double Decker Fabrics! And she included another one of her amazing note cards with it!
I’m loving these prints! I think first off I’m going to make another Sunny Glasses Case with the off-white glasses fabric. It would be perfect! The cassette tapes have been claimed by my husband – a Man Bag is in the works! I’m thinking the amazing teal colour of the records will go with my kid’s clothing, and it looks so retro – maybe a jumper? I love the TV’s too – especially the green, and the repeating print… hmmm… I’m still thinking up the perfect project before I cut into that one… any ideas?!
Thanks again Dorienne!
by Sherri Sylvester | Sep 2, 2013
Sometimes I troll thrift stores looking for fabric. They can be a great source for vintage fabric, if you know what you are looking for. This dress was made with one of my finds. I think it might have cost me $3.00, and it is in great shape! So far the research I have done has not led me very far to finding out much about the “Petticoats and Pantaloons” fabric from Roth Greeting Cards by the Manes Organization. One person’s guess is that it is roughly 1970’s era. Either way, I love it! Do you shop for vintage fabric?
Vintage Fabric Dress
I originally made this dress for my oldest, I think about a year and a half ago. She wore it a few times, but somehow when I was drafting the bodice for the dress I did not put in enough ease, so she didn’t wear it often. I pulled it out last week to try on my youngest and it’s perfect. Thank goodness for remembering to go through the boxed up clothing!
The bodice was altered to be larger and traced from another pattern, not sure which – shows how well I keep track! The skirt was made as full as I could manage, it is the entire length of the full cut of fabric. I think I may have gotten about a metre. I also made it as long as possible, which decreases the “twirl factor”, but increases the cuteness!
I think I am really loving the maxi-dress length on my kids right now, even though it is not so good for playing in. The kids love it because they can pretend to be princesses. I remember feeling that way in a long dress when I was their age too!
I generally don’t get too excited about buttons, but I think that has more to do with the fact that I don’t sew a lot of items with buttons! When I made this dress I made the bodice just long enough that I was able to only use 3 buttons, because these were the perfect ones! They are not wooden, but look it from a distance. I can see becoming very addicted to collecting them! Actually, I sew a lot less clothing than I think up in my head. I’d love to sew more, but the time it takes seems always to be directly in opposition to me doing anything else useful around the house – anyone out there feel the same way?!
It is still warm here – hopefully for a while, so the dress will get a lot more wear. I think it will look good with a long sleeve top underneath for fall as well, because I don’t think it will still fit next summer. Then I suppose it is going to be relegated to the boxes labeled “Keep” in my daughters’ closet. I can’t bring myself to give away the things I have made my girls – not yet at least… What do you do with the things you have sewn when they don’t fit anymore?
We’ve got some exciting things happening between posts here at Thread Riding Hood. A few shops have asked, so I am now selling Licenses for three TRH projects so you can make and sell items that have used the free tutorial – more on that later on in the week! I’ve also got a pattern or two in the works (I’m SUPER excited!) and am hoping to do a Facebook pattern tester call later on this month.
Also – if you have been waiting patiently for the Empire Waist Scirocco Sundress tutorial, I will have that for you on Thursday of this week – along with a surprise from Figgy’s Patterns! You’ll not want to miss it!
by Sherri Sylvester | Aug 29, 2013
This post is for Ellie in Toronto! It is one of the “you asked for it” posts from my Blogiversary giveaway. I asked everyone to give me ideas of things they would like to see on the blog, and Ellie asked for more brick and mortar fabric store reviews. So, here we go with the first and there is another one waiting in the cue!
A while ago, I blogged about visiting Ottawa Street to buy some fabric. Meg kindly commented on that post, letting me know about Needlework on James Street in Hamilton. I checked out her link and was totally hooked! Kate & Liz have the most perfect shop. It looks like all of the things I want it to. A great variety of fabrics, patterns and notions, a good selection of quilting and pattern books – all perfectly arranged. Oh, and did I mention the row of workstations with Janome’s at the ready? (And, I admit it, I stole today’s title straight from Needlework! It’s their web url.)
I went to visit them mid-July in my yellow Fiat, and picked up some goodies! The peony fabric went into making the Empire Waist Scirocco Sundress (the tutorial is coming next Thursday along with a surprise for you!) The typewriter button fabric can be spotted as an “M” button in my oldest’s Sunny Glasses Case. The others are stashed away for now!
I got to go back to their “last Wednesday night of the month” Craft Night at the end of July. What a fun place to visit! There were people working on everything from quilts to needlework to (I think) maybe a Wiksten tank?! I almost bought the pattern for the tank, not sure why I didn’t and now I regret not picking it up! It was really nice to meet Kate at the meeting. Liz was away on her trip to South Korea & Japan, you have to check out their blog for her Nippori fabric store photos!
Before I talk too much about them, I did ask a few questions, and so I will let Liz tell us a bit about Needlework herself.
Thread Riding Hood: When did you open the shop?
Liz: We opened the shop one and a half years ago, in February 2012!
Thread Riding Hood: What main types of fabric do you stock?
Liz: Our biggest selection of fabric here at Needlework is of quilting weight cotton, but we also carry a selection of linen, linen/cotton blends, and more recently: bamboo and cotton knits! We love modern and vintage inspired prints — fabrics with bright, bold geometric patterns, pretty florals, classic stripes, and polka dots! We love a good polka dot.
Thread Riding Hood: What are your favorite designers (fabric or otherwise)?
Liz: We’re big fans of Denyse Schmidt, Martha Negley, and Anna Maria Horner. We always look forward to checking out their latest collections!
Thread Riding Hood: What other crafty supplies do you stock?
Liz: In terms of patterns, we carry Megan Nielsen, Wiksten, Colette Patterns, and Victory Patterns. For the embroidery enthusiasts in town, we have DMC cotton floss in every colour, as well as some of DMC’s really lovely perle cotton floss. Other notables in the shop are these super cute DIY Embroidered Doll Kits from Kiriki Press, japanese sashiko patterns and thread, 100% wool felt, and needle felting supplies.
Thread Riding Hood: What is coming up soon that you are excited about?
Liz: We always look forward to our monthly craft night, an evening that we get to spend time with our wonderful customers, doing what we love to do most — sew! We’re also looking forward to Supercrawl this year, which is just a few weeks away.
Needlework also hosts a variety of classes for beginners and seasoned sewers, and has machines ready so you can Sew-by-the-Hour. It is an amazing creative space to be able to work in, and their machines were amazing to sew with. I got to try one out at the Craft Night! Here are a few photos of their shop to inspire you.
Hope you like the review. If you are in the area, make sure you visit Needlework, you won’t be disappointed. (And you can say I sent you!) Thanks for the great shop Kate & Liz!