by Sherri Sylvester | Jun 30, 2014
I’m so excited – today is the day we reveal the projects from the Frolic with Fabric Spot Challenge! These four ladies have made some amazing projects using Fabric Spot’s Frolic collection. The entire collection is 20% off until midnight tonight (June 30, 2014) if you want some!

Each challenger received 1 of 4 bundles of organic Frolic fabric. Two challengers got pink bundles, and two received the blue colour-way in the mail. The challenge was to make something using the fat quarters received, within the 3 week timeline. You can find out more about the challenge in this post, and here as well.
I have only been able to choose 2 photos of each project to feature here, so please click on the links and photos to see and find out more about their projects. It was so hard to choose, these four sewists have put so much work into this challenge! Without further ado, here they are…. (in alphabetical order!)
Carla – Carla’s Creations &
I decided to make my girls book/stuffies totes for the summer as they are forever wanting to bring this and that with them when we’re out and about. Well, usually their things end up in my bag! lol! Now they have their own quilted tote to fill with all their treasures when we’re out! I did some simple quilting and went with a single strap for their bags as I find most kids have trouble keeping both straps on their shoulders. Plus… this way their animals can see where we’re going too. 😉 I used all of the prints in this great collection on both bags, then they both chose their favourite prints for the inside of the bag & the strap! (link to her project here)
Cyndi – The Nosy Pepper & on Facebook
“For this challenge, I knew I wanted to make a diaper bag, but also that I would have to think on a smaller scale to make it work, so I used the Brook Field Pattern by Sew Sweetness. To go with the bag, I made a ‘wet bag’ that I appliqued an elephant on and used iron on vinyl to make the bag waterproof. I also made a whale softie in the elephant print, I had never made a stuffed animal before and luckily it was a lot easier than I thought! Since I knew I wanted to use as much of the fabric as possible, I made a couple of fabric trays to use up the scraps … in a blooming onion style crazy quilting block for the inside of the large fabric.” (link to her project here)
Laura – Seams Sew Laura
“I was so excited to win this bundle of beautiful organic cotton. The print with the elephants and whales and the very name of the fabric “Frolic” inspired me to make a swimming bag and wet bag for this project.
When I was a kid, I had one of these swimming bags with a round bottom and adjustable strap and a drawstring closure. For this project I wanted to make something similar but with a zipper closure. A while ago, someone sent me a picture of a similar bag sold by an Australian company and I used their product dimensions to make my pattern. I added a front zippered pocket and a waterproof lining, which is actually a waterproof tablecloth I found at my local grocery store. The bag is big enough to hold one of my signature hooded towels 🙂 and the wet bag and there is still room for more. My 5 year old daughter declared it a winner because it’s easy to open and she likes the pocket that can hold her “stuff”.” (link to her project here)
Sarah – The Crazy Tailor
“I’ve always loved the look of a hexagon-block quilt, but they’ve always seemed so complicated and time-consuming. I decided that a doll quilt was the way to get my feet wet with non-square blocks! I did a little reading on the various ways of piecing hexagons, and went with machine sewing versus the more common English Paper Piecing. They aren’t as hard as they look after all 🙂 I did some hand quilting (I’m breaking out of my machine-quilting rut…still rusty though!) and highlighted a few of the animals on the fabric. J and E love to find the turquoise whale or the yellow elephant! The quilt is already getting lots of use keeping zebras warm, and as a blanket for many tea parties. Thanks for including me in this challenge!” (link to her project here)
WOW! Just wow…. what an amazing collection of projects. And each is unique – hooray. Just think what you could do with it! A big thank-you goes out to Karen from Fabric Spot for providing this amazing challenge. It’s been so much fun to see what everyone has made!
If you have made any projects using the Frolic collection we’d love to see them! Please leave a comment with a link below so we can check them out. (And don’t forget to get some Frolic if you haven’t yet!)
** This is a sponsored post and the fabric and challenge idea was provided by Fabric Spot. As always, all opinions are my own and I will not promote a business that I do not love myself!
by Sherri Sylvester | Jun 29, 2014
I managed to only post twice last week – oops. I finished a quilt in 5 days though, so it was necessary! I’m so excited – you can see some peeks of it on Instagram if you’d like. It’s not a complex pattern, or huge, or even “all-over” machine quilted (I tied most of it), but it’s finished and I love it! It’s actually my second quilt finish in as many weeks. The first one is photographed and ready, I’m just waiting for a good time to post it.
Friday was the last day of school for us, so I’ve got summer in full swing now, including my 2 year Blogiversary that is coming up really soon! I’m planning some fun stuff to thank you all, so stay tuned…
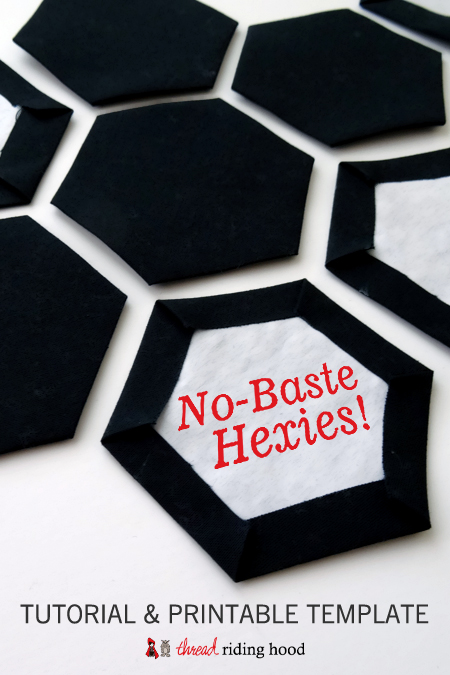
As part of my next Warp & Weft Sewing Society post I have put together a little tutorial as part of a larger tutorial for the quilt coming at the end of this week. I needed a few black hexies for a very mysterious part of the quilt (hee hee, you’ll have to come back to see it!) and I thought I would make my life a little easier. Turns out you can make these things without basting them! Instead of thread and a needle – you just need some freezer paper and an iron.
Now I know that the hand-sewn element involved in basting these hexies allows you to baste in the car, or make them as a “take-along” project. So, if you are one of those people I have a solution for you too. Instead of using an iron to adhere your freezer paper, try bringing along your hair straightener! The Riley Blake Instagram account posted this last week – and it would work perfectly. You could even use one of those outlet plugins in the car and make them on the road!
You will need:
Here we go:
Step 1: Cut the freezer paper to a size that will fit into your printer. I used a letter size sheet – so 8 1/2″ x 11″. I put them into the paper tray shiny side up, so my printer would print onto the matte side. Check which way your printer works before inserting the sheets. Now print out your hexie template. You can use the one I’ve provided in the “You will need” list or another one in the size you’d like.
Step 2: Cut out your hexie templates. This is not super fun, but it was a lot quicker than I thought it would be. I’ve noticed that there are pre-cut freezer paper hexie templates for sale online – so you could try that too.
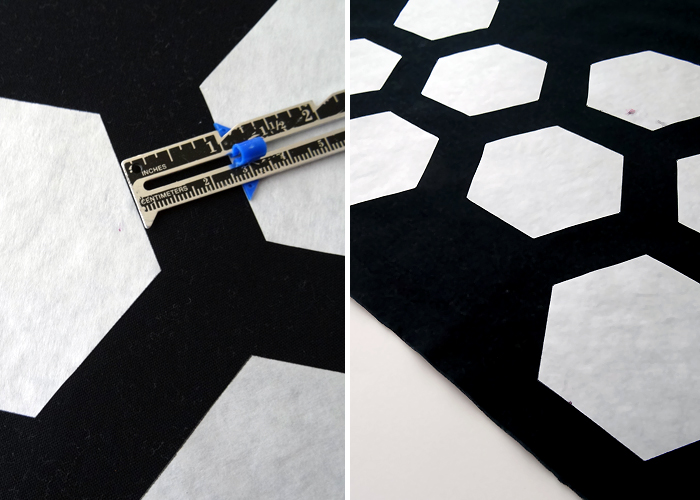
Step 3: Iron the templates onto the wrong side of your fabric, leaving at least 1″ of space between them. The space accounts for the 1/2″ seam allowance. Make sure the shiny side is DOWN, unless you want the paper to stick to your iron! The shiny side of the freezer paper is actually a thin plastic layer, so when you iron it, it temporarily sticks to your fabric. I use the heat setting on my iron that matches my fabric, in this case it was cotton. Iron just long enough to get the paper to stick.
Step 4: Cut out around your templates. Leave at least 1/2″ seam allowance around all edges of your hexies. This is the part that will get folded under and usually gets hand basted.
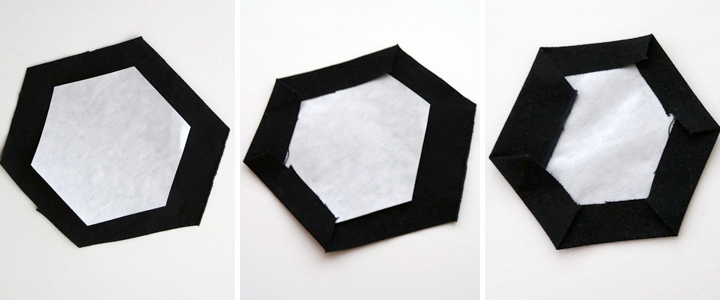
Step 5: Grab one freezer paper/fabric pair. Pull to remove the freezer paper and flip it over so the shiny side of the paper is facing up, centred on the wrong side of your cut fabric. Fold one edge of your hexie seam allowance over onto the freezer paper and iron it down. Easy peasy, it sticks to the plastic layer! Proceed around the hexie template folding and ironing each side down.
Step 6: When you are done, turn it over (paper side down) and give it a quick press with lots of steam on the right side, to secure the shape. (It might stick a little to your ironing board, but no harm done, just pull it off.) One hexie done! Repeat until you have enough to make your project.
When you want to stitch your project, just remove the freezer paper templates. Because the paper can be ironed multiple times, you may even be able to do this as you finish stitching them together. Anything to save cutting more templates, right?!
I feel that it is a little sad to be posting a tutorial with all of the hexies in black, they are so pretty when they are made in colour! Unfortunately, I needed black hexies, so that is what we get. Curious about the quilt much?! Here’s a little peek… I got to use Warp & Weft’s Charlie Harper Fat Quarter bundle. You’ll have to come back at the end of this week to check it out. I’m so excited to show it to you!
by Sherri Sylvester | Jun 26, 2014
Wow! We’ve had an amazing run of giveaways and discounts lately. So much thanks goes out to the super-amazing Thread Riding Hood sponsors! (right over there, see them… yup – over on the right sidebar there… !)
Today we’re announcing the winner of the Double Decker Fabric “Mixed Bag” Bundle. Dorienne (Double Decker Fabric’s owner) kindly offered it up for grabs last week and the winner is….
#191 Megan M. who said “Nice fabrics! I love the origami!”
So true… I love the origami too! So much, in fact, that I used Dorienne’s 15% off discount code to get some of my own! My order arrived in my mail box after a few short days, and Dorienne was kind enough to throw in some surprises for me as well. (Hooray!) My girls are over the moon excited about the Unicorn and Rainbow fabric. I’ve got an idea of how to split it up so they can both have something from it.
PS – Don’t miss out on the 15% discount. It ends June 30th – that’s this coming Monday! Use the code “Summer15” to get the discount.
PPS – Don’t you just love the little labels?! They are the Sweetwater Handmade with Love panels, and Dorienne sells panels of those as well.
by Sherri Sylvester | Jun 24, 2014
In the last year or so I’ve felt the need to do something “good” with my sewing – and especially my never-ending stash of fabric. I remember seeing some kind of pamphlet at my local fabric store last year mentioning something about pillowcases, but I “got busy” (as usual) and didn’t pursue anything. Enter Alanna, from Friday’s Off Fabric Shop in Toronto, to give me a swift kick in the right direction! Thank goodness… because I needed it.
Alanna has recently volunteered to become a ConKerr Cancer drop-off location. If you have not heard of ConKerr Cancer, they make pillowcases – called “Smiles” and donate them to local children’s hospitals. They are given to children with cancer and other life-changing illnesses or injuries. These pillowcases brighten up hospital rooms and help to fulfill ConKerr’s goal of “of making hospital stays as pleasant as possible for chronically ill children and their parents.” (via)
I am especially excited that Alanna will be dropping off her pillowcases at the Hospital for Sick Children in Toronto, Ontario. I have had personal family experience with this children’s hospital and would so love to give some smiles to the kids there. I’m really excited to say that my sewing group has decided to take one of our monthly Sewcials to sew pillowcases for ConKerr. Hooray! I am also hoping to sew pillowcases with my kids and I would love to make it a regular project that we can work on together.
Want to help out?! There are a few very important things to remember if you choose donate some pillowcases. Sew with this specific pattern. Get kid friendly fabric. Wash, pack and ship your pillowcase as per ConKerr’s instructions. Alanna has explained exactly how to do this in 5 simple steps on her website, which includes the shipping address of the drop off location.
I’m excited to say that Alanna also has kits available in her shop – to give you a simple way to get exactly what you need to make and donate a pillowcase or three! Below are a few examples of kits she has available, click on the photos or the links to get to her shop. (The yardage is also available in her shop if you would rather mix and match your own fabrics.) To make it even easier for you to order, Alanna is also offering free shipping from today until June 30, 2014 on all orders shipped within Canada – use the code “TRHFREESHIPPING”! This discount applies to pillowcase sales AND regular yardage for other projects – go and get ’em folks!
I hope you will join us in making the lives of these hospitalized kids and their families a little brighter. There is a lot more information about ConKerr Cancer available on their website and so many inspiring photos. They have chapters located throughout the US, Canada, South Africa and the UK. I know we likely all have fabric stashed away that could use a home, please consider ConKerr Cancer as a great place to give it to!
I’d love to hear from you if you plan to donate pillowcases. I’d also love to know if you donate your sewing stash and time to any other “good” causes. Hearing what other people are volunteering their time for is so inspiring. Thank you.
by Sherri Sylvester | Jun 21, 2014
Oh my goodness everyone! I fell so far of track on this Sew Along and I have to say, it feels good to be posting these again. It weighs on me when I don’t do something I know I’m “supposed to” be finishing. Thank you so much for all of your kind comments in my state of the blog post. I’m so glad to know that you are all reading these – even if you’re not sewing along. I so appreciate all of you!
This page is a favorite with my kids. In fact, when I had both quiet books out together they have had phone conversations – each girl on a different “quiet book phone”. I should have gotten a photo! I’m happy that they even know it is a phone – amazingly, since phones do not generally look like this anymore. This page comes together fairly quickly and I will provide instructions and pattern pieces next time. (If you are just starting find all the information you need on this Sew-Along page.)
You will need:
- Background Fabric: 1 piece quilting cotton exactly 9″x9″ square
- Dial Pad: 1 piece white fabric for dial pad – aprox. 3″ wide by 4″ high
- Dial Pad Numbering: fabric markers OR inkjet transfer paper OR printable fabric (more on this below)
- Telephone Body and Receiver: 1 piece quilting cotton aprox. 10″ x 9″
- Fusible Web: 1 piece aprox. 9″ x 6″ for the telephone body (I love using Steam-A-Seam 2 Fusible Web from the Warm Company)
- Phone Cord: 1 curly shoelace (length as is, do not cut) OR 1 piece of ribbon (cut to aprox. 8″)
- Velcro: 1 1/4″ long piece of 3/4″ wide hooks and loops (match the loops to the reciever and the hooks to your background fabric)
- Stuffing/High Loft Batting: a handful of stuffing OR 1 piece of batting aprox. 7″ x 3″
- Ribbon: 3 1/2″ long for the side tab
- Page Interfacing: 1 piece exactly 9″x9″ square, medium weight fusible interfacing (you will have this from your Week 1 shopping list)
My dial pad was made using inkjet transfer paper (available from your office supply store). You could also draw it yourself with fabric markers, or use printable fabric. I was also contemplating making some different versions available on Spoonflower. An 8″ square printed swatch is only about $5 + shipping, so it would be a great inexpensive to get one of these if you don’t have the other options available to you. Please contact me (sherri@threadridinghood.com) if you like this option and I’ll figure it out.
And… we’re done for this week! Please check the Sew-Along page for a list of all the tutorials + ways you can share your book. As usual, please let me know if you have any questions: email sherri@threadridinghood.com or leave a comment.