by Sherri Sylvester | Feb 1, 2014
Last Week’s Survey Results:
Last week’s survey asked “When do you primarily buy fabric?”. Over half of you buy it sometimes with a project in mind and sometimes when you see a fabric you like. I was wondering if this would come out as the result, because it seems some fabrics are too pretty to pass up – unless you are one of the very disciplined 12% who only buy fabric (and just enough fabric) for each project. How I envy you and your non-stash. I would have so much more room in my fabric closet for notions if I did that! A big thank-you to Mirjam from Dekawear for last week’s question.

This week I’m hijacking the survey to ask a question of my own. As all of my Facebook friends know by now (hi!), my machine has been down this week – apparently the timing needs fixing. I’ve been using my time to deep-clean my sewing room and office and it has been great. I love how tidy it is and I’ve been able to find a place for everything, which is going to help a lot towards being able to keep it clean in the future! My question for this week is related to your fabric scraps. I found a lot of fabric in small pieces that I don’t want to part with, but my scrap bin is overflowing. Just as with everything in my life, I have a hard time throwing things out! I know that quilters have various ways of dealing with the scraps, sometimes cutting different lengths and sorting them that way. Do any of you have any tips and tricks you use? I’d love to know what you think… the survey is after the photo, and please comment with your own solution, if my options don’t suit you. (Want your sewing project or blog featured on Sewing Survey Saturday? It’s easy! Find out how at the bottom of this post!)
This Week’s Survey:
[polldaddy poll=7765093]
How to get your Sewing Project or Blog featured on Sewing Survey Saturday: Send an email to sherri@threadridinghood.com that includes your sewing related multiple choice question, your name and where you live (if you’d like it included). Please send your question with 3 to 5 multiple choice answers. Also send your blog information including which post you’d like me to link up to if you are featured! If you do not blog I would love to post a photo of one of your recent projects, so please send it along with your question. (Note: I may also feature a photo from your blog post (if applicable), if you do not want a linked photo please let me know in your email.)
by Sherri Sylvester | Jan 30, 2014
Here is the last set of quiet book pages PLUS a very important question at the bottom of this post! (Here is the Quiet Book Construction post and the Quiet Book – Pages 1-6 post if you’re looking for it.)
The 7th page is the Tired Teddy Bear page! This is the wonkiest teddy bear I have made yet! He is crooked and I (still) can’t embroider properly, but this page gets the second most use in our house. For some reason it is awesome as a toddler to put teddy to bed and pull him out again (poor teddy!). I used a small piece of sweater knit to make him cozy, and the quilt ends up being 1″ squares, which is tolerable in a page this small. Teddy’s pillow is a scrap piece of fun fur. He really is cozy in there. Except for the jingle bell in his stomach – that’s really gotta feel a bit uncomfortable!
I love rainbows. And every good kid’s book needs to explain colours – so this page is one of my favorites. I basically found scraps of each colour and stitched them together. The lettering is made with a fabric pen. My favorite part are the wiggly-eye buttons I found somewhere. I stitched them on like crazy and thankfully they didn’t get chewed on!
This car page was almost the death of this project. I didn’t have a piece of this fabric large enough, so I stitched some smaller scraps together. Really… and it really looks like a road still… I know, I’m crazy. And I actually switched thread colours as needed – amazing! It took a while and if I remember right the project was at a stand-still for weeks while I didn’t allow myself to sew anything else until it was done. The unfold-able page also has a zippered pocket so the Square, Circle and Triangle cars don’t go missing. Shapes are important for learning, but are very impractical as a model for cars! They are made out of 2 layers of leather scraps I had around, and lots of patience and slow sewing.
The door/house page was the first one I made. I wanted it as scrappy-looking as possible and it is one of my favorites. For some reason, no matter how many of these books I make, The door knob snap always ends up on the wrong part of the inside fabric. I really should have put the elephant in a different spot, and that will always bug me!
Kids like peek-a-boo and this page is included in countless other quiet books I looked at for inspiration. I made the mitten extra large so it would be easy to put on. The photo can actually be changed because I left an extra-long (kid-proof!) flap on the top of the clear pocket. It folds down behind the photo.
The last page has an abacus of sorts. Only with different amounts of beads on each string. I stitched the life out of this page ensuring that it would be safe for my 1-year-old baby. I think I glued the ends of the strings, then stitched on the rick-rack, then double-stitched… you get the picture. I made these numbers in puffy paint. In hind-sight, I am never going to use puffy paint again – it looks kind of tacky. But it works, and it reminds me of the 1980’s/90’s? – when I was “cool” and wore shirts I made myself, with puffy paint!
So, there you have it – the whole book! What do you think? Are you interested in sewing 1 or 5 of them?
I am curious to know if you would like to make one as part of a Quiet Book Sew Along. We could fit in 12 pages + a cover by the end of November (ie: before Christmas!) if we sewed 1 page every 3 weeks. I would post one part of the tutorial each week, allowing for material collection, sewing and finishing. Interested? Leave a comment, and if there is enough interest we’ll do it – so please let me know!
by Sherri Sylvester | Jan 28, 2014
*Update: This Quiet Book is now a Sew-Along! Check out more information in the Overview post.
I’m so glad all of you are excited about this project! Thanks to everyone who took the time to comment on the last post. I especially think that Shari’s comment about switching out the binder rings for large key rings is genius! That would work way better and there would be zero chance that the kidlets remove the pages or get hurt/pinched that way. If you are just joining in, the last post was about the construction of this quiet book and the next post will have the last 6 pages. I’ll link it up here when it is posted. *Update: The last 6 pages are here.
Here are the first 6 pages of the Quiet Book:
The first page is a good ‘ol “button the flower” page. I had a lot of fun with green rick rack and some felt flowers I had picked up on sale somewhere. I think I bought these bee buttons especially for this page. Make sure the button hole is BIG so little hands don’t have problems practicing their buttoning. The curly lines are made with a fabric paint pen.
Next is the pretty purple purse page (say that 10 times fast!). I wanted a way to include family photos in this book because little kids love looking at pictures of people they know. The purse holds a tiny album (made with clear plastic) and a photo of every family member. I think it is the silver rings and purse handle that make this one cute. It’s just like a real purse – only with less stuff inside!
This is the shirt and pants page. The “please learn to dress yourself” page! I included the bottom of an old shirt and the top of an old skirt. The skirt can be used for snap and zipper practice, and the ribbon belt can be buckled and unbuckled. The shirt holds a little surprise – it comes with it’s own belly button, very Cabbage Patch-esque! My daughter thinks it’s hilarious – so I’m glad I put it in.
The telephone page always gets the most use at our house. As you can see from the seam that needs mending on the receiver. I’m not sure why I made such an old fashioned phone. I suppose a cell phone would have made more sense – or a cordless one at least! But the kids know it is a phone, so it works. The cord is a curly shoe lace. The number pad is made using white fabric and an inkjet t-shirt transfer.
Tying your shoes comes much later in life, so I’m not sure why I included it. This shoe lace has actually spent most of it’s life tied in a double-knot – so my 1+ year old couldn’t untie it and choke on it. Maybe I should remember this page for when my oldest gets her first pair of tying shoes!
Counting is always good, and puzzles. This page combines them by using some really great fabric I think I still have a bunch of. The numbers and pictures are cut out with notches for each. All of the pieces are stuck on with Velcro. They can be interchanged, but they don’t match up if you do it wrong! Tricky! (hee hee) I think I put fusible fleece in between my layers to make them thicker.
That’s it for the first 6 pages. Hang in – there are still 6 more pages to go! I’m sure I will be posting them in the next few days.
by Sherri Sylvester | Jan 28, 2014
This week’s post subject is a un/happy accident – or not (we will find out tomorrow!). As I was finishing today’s project my machine decided to make some lovely loud clunking noises. So I decided I should pull out a project to show you that has been around for a while.
*Edit* This book is now a free tutorial series! CLICK HERE for the FREE 12 Page Quiet Book Series – Including links to all 27 posts and tutorials!
I made each of my girls a quiet book when they were 1, this book is my youngest’s. It is one of the most time consuming projects I have ever made, but I love the results! Everything is attached to the book – which was important to me – I hate lost pieces! And (almost) nothing is felt. If you are here for ideas, please take them. Be warned – this takes a long time, a really long time! But, in the end it is worth it, and it is a wonderful keepsake.
The no-felt idea came about because I really wanted everything to last as long as possible. I think I have/had the idea in my head that felt balls up and tears and is in general an inferior product to fabric. I think though, if I was to do it again, I might be open to using some – just maybe the “good stuff”, and not the felt from my local craft store. Either way, not using felt makes the whole project take a lot longer, since every seam must be finished and pieces need to be “good on both sides”!
I have made a few of these and I think the method of attaching the book pages is different in each one. I like this book’s construction the best. It is the easiest to add pages to and simplest to construct. One piece of grosgrain ribbon, stitched with 2 channels for 2 binder rings. Each book page has 2 loops added when it is stitched together, and it is hooked into the binder ring – tada! I thought maybe my daughter would figure out how to take it apart, or start chewing on it and happily neither thing happened! So I think it is a success.
This book also has a ribbon tag on the outside edge for each page. The ribbons all correspond to something on that page and I love how they look. It makes the book all the more fun-looking. I also love the outside fabric – Alice in Wonderland. It may seem to be a bit morbid to make a child’s toy in black – but it sets off the colourful pages so nicely! Inside this one I was apparently into making work for myself, because many of the pages have a patchwork background. I love looking through and remembering where a lot of the fabrics came from. I really need to make a scrappy quilt top someday to use up my scraps and keep my memories somewhere!
The outside of the book is flat, I think I added in some interfacing and fusible fleece. If I was doing it again I would most definitely add in some batting and fun quilting. But this thing is almost 3 years old and I’ve learned a lot since! The grosgrain ribbon goes all the way around the book to the back, where I’ve added a tab and velcro. It was sewn on before the inside was attached. So the stitching doesn’t show on the inside. I’ve also used ribbon and bias tape to finish the bottom and top edges of each page. It was what I had on hand at the time, and with an almost 1-year-old around you generally don’t just “run” to the store for something!
This was going to be the world’s longest, most photo heavy post – so I decided to split up the construction and the pages and post a few times in a row this week. I will update each post with links to the others as I go. What do you think so far? *Update: You can find the first 6 pages here and the last 6 pages here.
by Sherri Sylvester | Jan 25, 2014
Last Week’s Survey Results:
Last week’s questions asked “Who do you primarily sew for?” An overwhelming 44% of you sew for your kids/nephews/nieces and grandkids. With a not-so-shabby 30% coming in second with “a combination of everyone”. So – now that we know everyone’s priorities I’m sure you can guess mine! I would most definitely fall into the “combination” category. And you can tell from my bloggy wanderings, a little of this, a little of that! Let’s not forget to thank Amy from Friend’s Stitched Together for last week’s question! Thanks Amy!
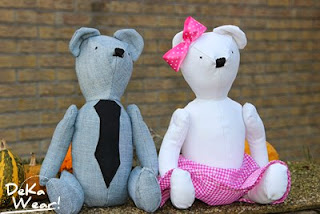
This week we have a guest question from Mirjam, who writes Dekawear in the Netherlands (province of Zeeland). I’ve really enjoyed following Mirjam along through her blog and am especially grateful for the thoughtful comments she leaves here on Thread Riding Hood! Mirjam sent me three tutorials to choose from and I have had a really hard time deciding which one to feature! I think that most of you (since you sew for kids and grandkids, re: last week’s survey!) will appreciate seeing a unisex project that everyone would love, so I’ve chosen to feature her teddy bears. Can you believe she stitched these out of re-purposed jeans! They are so cute – check out her post to find out where you can get the pattern. I might have to make some for my kids too – everyone loves a cuddly bear, especially when it is handmade! And, because really I couldn’t decide – here are links to her backpack and Ethan shirt as well! (Want your sewing project or blog featured on Sewing Survey Saturday? It’s easy! Find out how at the bottom of this post!)
Image Credit: Dekawear (Used with Permission)
This Week’s Survey:
[polldaddy poll=7744909]
How to get your Sewing Project or Blog featured on Sewing Survey Saturday: Send an email to sherri@threadridinghood.com that includes your sewing related multiple choice question, your name and where you live (if you’d like it included). Please send your question with 3 to 5 multiple choice answers. Also send your blog information including which post you’d like me to link up to if you are featured! If you do not blog I would love to post a photo of one of your recent projects, so please send it along with your question. (Note: I may also feature a photo from your blog post (if applicable), if you do not want a linked photo please let me know in your email.)