by Sherri Sylvester | Oct 4, 2013

As I was saying on Sunday – I splurged a tad to get some Liberty of London fabric (eek!) from Bee Modern Fabrics and Yarn last month. It came home in a super-cute bio-degradable re-usable bag – made in Canada! The bag is “hiding” under my Liberty Scarf Kit in the photo above, also packaged to look as amazing as you’d want to expect for Liberty.
I have to say (at the risk of sounding like a fabric snob) that I really love my little piece of Liberty! I wasn’t sure what the fuss was about until I got to see and feel it for myself. The prints are so pretty – pretty in the truest sense of the word. The florals are very feminine, but not too over the top. And the colours are amazing – the blue and peachy coral go so well together and aren’t a colour mix you see everyday.
I hemmed my piece up a few weeks ago using the handy rolled hem instructions provided with the pack. I ended up sewing the ends together with a french seam to make a faux cowl/infinity-type scarf. It is not quite long enough to be an infinity scarf, but I really like the look of it anyhow. It’s just a bit cozier than it “should be”! Bee sells longer lengths specifically for making infinity scarves, and ones with beaded or crocheted ends as well. (By the way, I’m so irritated that I forgot to wear earrings for this little photo shoot!)
I also got a few other things (of course!) while I was there. Since Monique stocks Rowan thread, I decided to pick some up to play with. Maybe a small quilting project? I’ll have to pick up some Amy Butler fabric to make it with of course! I also picked up some Riley Blake “Hello Sunshine” by Lori Whitlock, the Spa Scallop that I used in my latest Toddler Backpack and some California Dreamin’ by Jenean Morrison for Free Spirit. Oh, and 2 metres of green Kona cotton that was on sale. I was going to get 1/2 m – but my husband liked that it was on sale and tells me I will thank him later for upping the quanity! I’m sure he is right… I’m thinking a Sally dress with the California Dreamin’…
Hmmm… oh, sorry… you’re still here… right! It’s been one of those days. The kind where you want to finish things (like butterfly backpack pattern pieces!) and you suddenly remember the 7 things you need to do that aren’t on your list for the day.
Oh, and I should mention that if you haven’t noticed around the web, the Sew Fab Fall pattern bundle is here for only a few more days (ends Oct 8)! I bought the spring version and it was amazing. This time it’s bigger! You get a bundle of 26 pdf sewing patterns for $29.95 – but it’s only available to buy for a week! That works out to just over a dollar a pattern… amazing! You can get the bundle here from Sew Much Ado, Abby’s super-cute quilt pattern is included in the pack. I bought mine on Monday of this week and have been dying to use it. Maybe something will show up on Monday’s post… we’ll see!
by Sherri Sylvester | Oct 1, 2013
Happy Super-Tuesday! Today you get to read would-be-yesterday’s post. I was feeling a bit under the weather so I decided to post this today and get some rest – thankfully it seems to have worked!
I have likely postponed this post way too long – my apologies to all of the sewists out there who have taken the time to share their Thread Riding Hood Super Hero Capes! When I posted the tutorial for these capes I had no idea they would be so popular and I’m super-glad (hee hee) you all like the free pattern. So, without further delay – here are (a very few) of my favorites! Too bad I can’t post them all! Check out the descriptions for some great tips and fabric ideas.
This is the first super cape that was shared with me, and it totally made my day! Thanks Sdeaf! (photo: Sdeaf on Facebook)
Linda made these for her grandchildren… Narrator Voice: “After “V” saved the princesses, “O” tricycled off to save the world!” (photo: Linda via Facebook)
This cute cape was made by Laurie from Dresden Lane. She used a “super” Ann Kelle fabric to make her Super Grover cape! (photo: Laurie, blogged: Dresden Lane)
This photo comes from Christiane who used plastic tablecloths to make easy capes for her daughter’s birthday party. The kids were able to decorate them and take them home! (photo: Christiane on Facebook)
These little capes have super-cute super buttons! (photo: Sandra, blogged: Suddenly Sandra)
Nancy has made all of these capes and plans to make more to give out at her local children’s hospital. What a great idea to help sick children feel like heros! (photo: Nancy via Facebook)
I love the stripes on these capes that Sarah made. Her daughter chose the fabrics, they are lined with polka dots! (photo: Sarah via Facebook)
This wild cape was made for a very special granddaughter! (photo/blogged: Quilter in the Gap)
I LOVE the princess crown – what a precious photo! Lynn plans to use old bridesmaid dresses to make more capes – a great use for them! (photo: Lynn on Facebook)
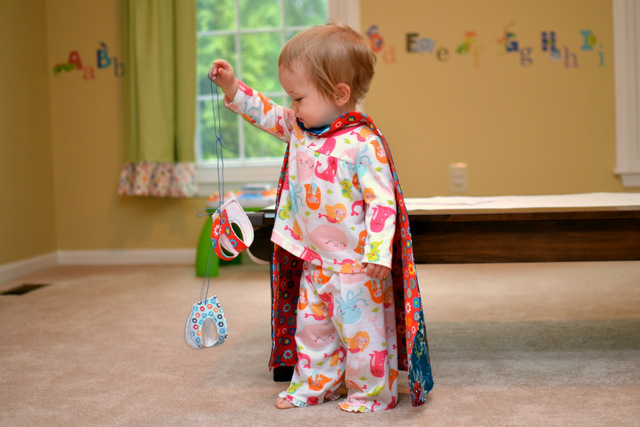
Ending with another cutie?! This cape wasn’t made for her, but she looks pretty comfortable in it! Laurie also made some eye masks to gift with the capes. (photo: Laurie, blogged: Life Between Snapshots)
After all that Super-ness, you can’t help but have a Super rest of your week! Please be sure to share your photos – they make my day! See you again soon!
by Sherri Sylvester | Sep 29, 2013
A few weeks ago I took a trip to Bee Modern Fabrics and Yarn in Niagara on the Lake. They have been there for 10 years and are excited to be moving to Virgil (about 10 minutes away from their current location) this fall. I first stumbled into their shop a couple of years ago and was excited to see that their selection has grown considerably since the first time I was there.
Their fabric selection is varied – fat quarters, yardage, lots of polka dots (love the dots!)! Monique gave me a detailed tour and was explaining their fabric buying practices. She tends to buy stash-able prints that will work with “that amazing print you just bought online”. Looking around, that is certainly the case. She has a good selection of solids and lots of blenders and stash builders.
They also have a very large selection of Kaffe Fassett prints in preparation for a visit from Kaffe himself, happening this coming week on October 4th and 5th! If you live in the area you can find more information on their website here. There are two workshops with Kaffe on the list.
They also run a wide variety of sewing workshops including some for kids. One of my favorite parts of the tour was their upstairs workshop area. They have a really nice space for sewing upstairs in their current location – and a larger brighter one planned for their new space. I like that their sewing machines are arranged around one large table so that the sewing can be done while chatting. My kids really took the upstairs space too!
For those of you who knit or crochet, there is an amazing selection of yarn available. I don’t know a lot about yarn – but Monique’s descriptions sounded amazing! They have a wide variety of types and prices, and some GORGEOUS colours! The colour selection of Norwegian Merino machine-washable wool is so pretty, it makes me want to learn how to knit! Their budget-friendly prices are nice to see too. Monique was explaining how their lowest priced yarn – great for donations and church sale projects – is super-soft when washed, not like other similarly priced yarns from large box stores.
They also stock Libery of London fabrics (eek!), so I splurged a tad while I was there, and bought myself a scarf kit. (What else is birthday money good for anyhow!) Bee Fabrics has pre-cut and packaged these kits as an easy way to have an affordable Liberty scarf. Since the width of the fabric is not long enough to make a nice scarf, this is a great way to have a longer piece without buying the extra fabric to get the length. She also stocks Liberty binding, and of course sells the fabric by the metre as well. Her Liberty Oliver and S Family Reunion dress is so cute!
Just in case that wasn’t enough, Bee Fabrics stocks patterns and books, Rowan thread and wool felt. Monique also orders ribbons, notions and buttons from Europe for the shop. I really appreciate the time she took to tell me about their shop and I’m excited for them as they move into their new location. It is well placed with lots of parking, large bright rooms and a pie shop across the street – what could be better?
I think I might have to organize a trip there after they have moved for a workshop with “The Material Girls” (My newly named monthly sewing club!). I hope you get a chance to check out Bee Modern Fabrics and Yarn. If you do visit, be sure to let me know what you stashed!
by Sherri Sylvester | Sep 25, 2013
Project Run and Play Week 3 is “Mad for Plaid” themed. This is definitely my favorite outfit of my three sew-along entries so far. My opinion is a tad biased because I spent the most time on this one and I love the final photos! I spent a day and a half drafting the pattern and another day and a half making the dress. (Give or take a few hours making dinners, playing with the kids, sleeping, eating, cleaning the house…) Here it is:
The design of the dress comes from a photo that my daughter drew up a few months ago. I think she is pleased with the plaid outcome, but doesn’t think it matches her design because the dress was “supposed to be pink”. Ack, I guess I’ll have to make another one now that I have the pattern! When I said I was going to copy her drawing she also told me that the dress most definitely needed to have puffed sleeves instead of straps. To do that I changed the ruffles to come from a curved bodice so I could have somewhere to attach the sleeves. I also shortened the zipper in the back to go about 3/4 of the way down the back instead of separating at the bottom – since it didn’t really need to be that long.
You can also see her version of my logo on Facebook today!
The drafting process was trickier than I had counted on, mostly due to the fact that I didn’t get a solid amount of time to work on it. Coming back and forth caused all sorts of problems when I didn’t remember if I added seam allowance to certain areas or not! Going forward, I’m labeling all pieces with seam allowance amounts on the edges so it’s easier to follow. My original idea was to curve both the front and back bodice pieces down – but when I made a muslin it did not lie well or look flattering on the front – so I upwardly curved both bodice pieces, only to have the idea to curve the back down and the front up. Now I was reversing my work and digging for cut off pieces of drafts from the day before. Argh! Another lesson learned – re-trace all pieces and label them with dates or version numbers so I can go back and forth more easily.
I didn’t draft this completely from scratch. I started with McCall’s M5793 pattern and used the sleeve and front and back bodice pieces as a start. The sleeves now have a cuff instead of an elastic casing and the bodices have been altered to curve on the bottom edges. I used freezer paper for the pattern pieces and it is quickly becoming my favorite. It is thin enough to see through easily for tracing, and is very strong and more durable than the cheap paper rolls I was using. It is also really nice to be able to iron the paper to the fabric and then cut it out before removing the pattern piece. It holds everything in place, which is really important when matching plaids!
On the subject of matching, I was pretty pleased with how everything lines up on the back of the dress. That said, I think it would be fun to have the back bodice cut on the bias, like the front is. If you take a look at the inside of the dress (I’m feeling brave today, so I’ll show it to you!) you can better see the shape of the bodice – which would have shown up more on the outside if I had bias cut the back outer bodice. You can also see the 2/3 of a circle skirt that I added to the dress – super twirly! This one was tricky, because I have tried to add circles before, but did not do it correctly so the hem was longer on the sides than the middle. I figured out that you need an invisible point to measure to so that all points along the circle are the same length – whew! I was super-happy when the muslin hem hung straight! I did line the back, but not the front because I was worried that it would be too heavy. I’m really glad I didn’t, the brushed cotton is not light – but I suppose it is not really a true lining.
The front bodice is cut into two pieces, the curved upper and the lower piece that ends in a straight line and attaches to the circle skirt. It doesn’t show that well from the outside because of the ruffles, so you can check out the inside pics to see it. This was the easiest way I could figure out to make it lay properly once my daughter was wearing it. Otherwise I was going to have to add some kind of dart to the front to curve it in enough to meet up with the upper curved portion – and I didn’t want to have to draft that! Especially if it wasn’t going to show under all of those ruffles. Do you have any drafting tips? I’d love to get better at this.
Speaking of ruffles, which are apparently on trend according to Sew Mama Sew’s contributing writer Rachael from imagine gnats – I love these! I was not sure how a dress would look with the plain back and ruffled front, but that was what my daughter drew – so that is what I drafted! Each ruffle is double the width of the skirt panel it is attached to. The top ruffle was an inigma fun to draft too – I had to curve the ruffle piece so the bottom would hang straight even though the top was curved. I felt like I was a kid again with one of those graph-squared pictures you are supposed to copy one square at a time (like this)!
I hope I didn’t bore you with details this time around – I needed lots of space to include my photos, it was so hard narrowing this shoot down! Next week’s Project Run & Play is to make something that shows your own signature style. I’ve been stumped by this one for the three weeks it has taken me to get here – I am not entirely sure what that means, or what my signature style is! I do think that I most often take a pattern and alter it – similar to what I did here. If I was to make something for next week it might be the same dress (in pink of course!). We’ll see – it is possible I will skip it all together unless I get some kind of genius idea! If you are interested, here is a link to the other plaid sew-along entries – Which is your favorite?
by Sherri Sylvester | Sep 23, 2013
Happy Monday! I am in the middle of my 3rd Project Run and Play sew along project… so this week’s Monday post will be short and sweet. I cannot believe how long it takes thinking up, drafting, making and blogging a new clothing piece for my kids each week! It is so much fun though – I’m really enjoying it. I’ll be posting a teaser on Facebook today I think!
I made up this little drawstring backpack after being inspired by a ladybug one that I saw at a kid’s store a while back. It was the perfect idea to make for a 5 year old whose birthday party happened this last weekend.
Butterfly Drawstring Backpack
I love how the drawstrings come out of grommets in the casing to make the backpack straps. And they are adjustable with some easy button holes, so I got to choose some really great pink buttons (the photo doesn’t do them justice – they are kind of translucent with a bit of swirl) . I’m also happy that the wings stand out as well as they do, since the whole thing was a new project and I wasn’t 100% sure what to use to stiffen them.
It was pretty fun when my husband asked if the design was my own and then being able to tell him it was. The “That’s really impressive!” response was totally worth it! The hardest part though, was telling my daughters that it wasn’t for them… I have now promised to make them each one too! I’ve heard back from the birthday girl’s mom and apparently she likes it – Hooray!
My only dilemma now is how to make the next two – I could go over the top with a mash-up of patterns and colours or make a neutral base with solid coloured wings and spots… hmmm…. which would you make?