by Sherri Sylvester | Jan 24, 2013
I was talking with my husband about the horrible state of Canadian online fabric shopping, at this point I had found only one store and the fabric selection is not exactly my taste. So I went looking further and managed to find 6 shops! (If you are from the US you can just ignore this – you are SO lucky to have so many good online fabric stores.) Anyhow, getting back on track…

Speaking of fabric… how about some eye candy!
I have pinned them all onto this board called Canadian Online Fabric Stores. {Update: There are now many more shops thanks to my wonderful readers!} If you are in Canada I hope the list helps you out. I will continue to update and pin more (if I can find them!) I am noting that they are “Untested” if I have not tried to buy anything from them and will update the status of the store if/once they have been tried. If you do try one, or know of one that is not on the list, let me know so I can pin it or add your comments. If we all work together we may be able to save each other some of the trouble (and the shipping and customs costs!)
Note: No fabric prints were harmed in the making of this photo!
Just to keep you guessing… I am posting a tutorial that uses this photo on Saturday. It is for something we made at our “Sewing Club” (name yet to be decided). And, if you want a laugh or a groan(!), check out the comments on this post. There are a lot of very creative people out there thinking up names for our sewing night. Add your own! We’ll let you know what we land on.
** Update: Since this post we’ve interviewed several Canadian Online Fabric Stores and posted more about Canadian online shopping. Click here for more posts. Follow along on Facebook, Twitter, Instagram or Bloglovin’ so you don’t miss any new information! And of course – don’t forget to follow the Canadian Online Fabric Store Pinterest board. Go get some fabric!
by Sherri Sylvester | Jan 21, 2013
So… I was going to post this in the early afternoon today – I even had a plan for how I was going to have time. But, we are in the midst of the start of potty training, and my youngest has announced that she has “Super Super Super Pee.” (Say it again in a cute two-and-a-half year old voice with a slight lisp and extra inflection on the third “Super” and it’s funnier!) So, the plans were delayed and we spent countless hours in the bathroom a lot of quality time together today.
I have been waiting to share this project for a while now – but somehow I didn’t ever find the time to get “the photo shoot I saw in my head” out onto the camera. If you are following on Twitter last night I said I was tearing the living room apart (and I wasn’t kidding), you do what you’ve gotta do when you only have one “photo appropriate” blank wall in your house!
Anyhow – the kids and I have had a blast and I am excited to show you what I made for my girls and their cousins this Christmas. (It is possible, however, that I am more excited about the photos than the project… we’ll see!)
the MADE Beach Robe
I have been waiting to make these robes for a few years. It seems this is my life right now – I am starting and (thank goodness) finishing things I have been wanting to do for a while. Such is life with little kids.
The pattern is from MADE, the Beach Robe. This thing is a really great idea. We have used them for the kids and they love how warm they are and the ties are great so they don’t fall off.
The hood is the best. I’m glad I chose to line them. The pattern includes lining the hood or not – but it really adds more colour and professionalism to the whole thing. I made my own bias tape also, to match the lining. At the time I went crazy making 8-9 metres of bias tape for each robe – ack! Now I am glad I did. The striped bias tape on the blue robe especially looks great because of the angle.
I mentioned these before in an October post, here. As you can see there is one more that didn’t get finished – the trucks just didn’t make it as the Christmas crunch time happened. It’s on the to do list for the little guy’s birthday!
There were so many photos I couldn’t leave out… so now you get to enjoy them too!
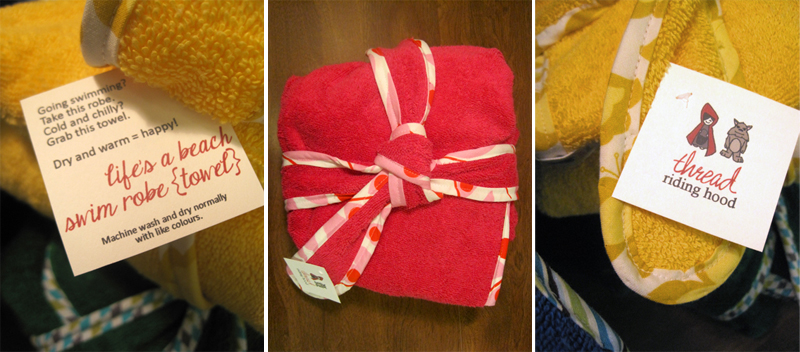
Of course the graphic designer in me can’t stop at the robe. I packaged them up with my little square tags. This year I decided to attach them by stitching them on and I’m pretty happy with the results. Also, it’s much easier than trying to tie them on with a ribbon. The robes tie quite neatly into a squarish “package” and stack up pretty cute too!
The parting photo and another quote (this time right before bed) from my little one make everything worthwhile. “Mommy?…. You are the best mommy… in the world… ever… luv you.”
by Sherri Sylvester | Jan 19, 2013
The first and most exciting is that the first meeting of the …. umm…. “Friends We Know that Sew” Club… was last night. We’ve definitely got to come up with a better name for it! Everyone was commenting that they aren’t sure how to explain the …. umm…. “Club” to all of our non-sewing friends – so any suggestions (write in the comments!) would be gratefully received!
I should likely have taken at least 1 photo of the 5 sewing machines on my dining room table and the (gorgeous) fabric and amazing projects everyone was working on. It is so much fun when you are able to talk with a whole bunch of other people that love to talk about what you love to talk about! We are super excited to have another night soon and maybe all work on the same project together over an evening.
The second exciting thing is that I stole away for a bit this afternoon to go to the fabric store. I was inspired by one of my friends’ quilt projects and have bought fabric to make a couple of quilts for my daughters. I have had the pattern for The Proverbial Quilt by Denyse Schmidt for a few years and haven’t got around to making anything with it as yet. I think I have finally come up with a saying that I like and will post more about that later.
I’ve always been “scared” to start a quilt – first I am not sure that I have the patience to finish it – and to cut out all of those pieces! Second, I am overwhelmed by the enormous options for fabric that are online. I can’t decide what to pick and so usually give up before I have ordered anything. There are just too many good fabrics! I decided today that I was just going to go and pick something at my local specialty fabric shop and not care so much! Here’s what I came up with.
Quilt 1 – Pink and Blue
This quilt will be for my older daughter. I asked her to go through my fabrics and come up with some that she liked and she ended up picking a lot of pink and blue, so that was the starting point. I bought a few new fabrics to supplement what I already had. The solid pinks will be the text, the blues are for the front of the quilt and letter backgrounds. The pinks on the bottom of the photo are for the back. I still have to go find 2 more light blues at another store to fill out the selection – the fabric I was able to find for the other quilt is a lot more varied.
Quilt 2 – Purple and Green
My youngest will be getting this quilt. She seems to like green as her favorite colour, so I went with that and purple for good contrast when reading the words. The top solid purple/pinks will be the text, the greens for the top of the quilt and the darker purples (from the bottom of the photo) for the back. I knew I had been saving my Heather Ross “Far Far Away 2 – Sleeping Beauty” 1/2 yard for something special and this is it. I love her fabrics, and Sleeping Beauty is perfect for a tiny person’s quilt.
So long for now, I am off to prewash my fabric – how boring! If some of it had not been washed already I suppose I could skip this step…. ah well. Maybe I’ll get a bit of time to play with it tomorrow.
by Sherri Sylvester | Jan 14, 2013
I had to think really hard for what I was going to make my Father and Brother-In-Law for Christmas. They both love golf, but what to make that was going to actually be useful?
The Golf Towel
The idea for these towels came from a tutorial I found here. From there I basically went my own way. Though I think her idea of the corner is good, my husband – who also likes golf – thought it might not be so useful.
I used an absorbent bath towel with a chevron print for the back and some manly looking prints for the front.
These are super-easy to make in batches of 4 towels, or 2 of each as I did.
Mini Tutorial: 1) Cut your towel into 4 equal pieces (cut once lengthwise and once width-wise). 2) Cut your fabric to match the size of the towel quarters. 3) Place both pieces right sides together and sew, leaving a 3″ opening on one side. 4) Turn right side out, iron, topstitch close to the edge all of the way around (and closing the opening). 5) Add a large grommet in one corner and you are done!
Labeled and ready to gift!
by Sherri Sylvester | Jan 10, 2013
*** Update! There is now a tutorial on how to sew this bag here. ***
I noticed that the photo of my gray diaper bag – blogged here – is sending a lot of people from Pinterest my way. (Hooray!) Comments say “love the colours” – so in hopes of helping them out here are most of the fabrics I used.
The white dots: Michael Miller Fabrics – CX3755 Gray Huevos
The elephant fabric: Here is a similar one on Fabricworm: Jay-Cyn Designs for Birch Fabrics, Mod Basics, Organic, Ellie Fam Orange
Inside I used gray with white polkadots: Michael Miller Fabric – CX3744 Gray Quarter Dot
Unfortunately I can’t locate the gray with flowered white “dots” in my selvage pile – so this one is going to have to be anonymous for a while. I will post the name if I find it.
Along with that, Abby, the creator of Sew Much Ado (who posted the original tutorial) left me this super-nice comment – “These are great! Probably my favorite that I’ve seen yet! So cute, I love the additions you made, and the gray fabric is perfect!” How nice of her to comment back, and just minutes after she noticed that I commented leaving a note on her blog. So much fun!